

I think this is the longest break I ever took. Hopefully it wouldn't happen so often. Sudden rush of emotions and work madness didn't help. As a result, I could only stare blankly at the screen, not knowing what to do. Fortunately, after blogging for a while, instincts take over whenever I finish cooking a dish or completed an order, else there will be no pictures. Not sure if this is considered a boon or bane as this has resulted alot of backlogs, all sitting comfortably in the draft box, waiting for the text to be fit for posting. Of course, there will always be distractions like the Facebook farming stuffs. Facebook is a such a convenient platform to post anything and reach out to an audience. More importantly, you don't have to write much. As such, I have become lazier. It is not a good sign. Though picture speaks a thousand words, some memories, like recipes, have to be captured in words to be shared with loved ones.
I'm back with more recipes which I tried during this period. I will also be posting some pictures which I took when I went for my long walks, away from the maddening crowd, thinking and keeping my sanity. As usual, I am only armed with my camera phone so pictures might not do justice.
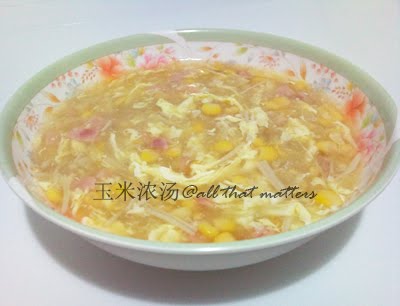
Back to the soup. This soup was what I read about during my late teens when I was addicted to Chinese romance novels. I managed to re-create the soup based on the descriptions and it was really easy. I came to know that this soup is quite common in Taiwan, kids take to it quite well. So I experimented on my kids years later.
Corn Soup (玉米浓汤)
Ingredients
1.7 litres Chicken Stock
380g pack Del Monte Sweet Corn Cream Style
380g pack Del Monte Whole Kernel Corn, drained
150g Enoki Mushrooms, sectioned into halves or third (depending on length)
Salt and Pepper to taste *(No salt is required if you use commercial chicken stock or you have already seasoned your homemade stock)
100 ml Water
4 Tbsp Potato Starch (3 Tbsp is you prefer less thick)
150g Ham, diced
3 or 4 eggs, beaten
Garnish (optional but recommended)
Chopped Parsley
Chopped Spring Onions
Method
1) In a pot, add chicken stock and 2 types of corn. Bring to a boil.
2) Add in Enoki mushrooms, stir for about 3 to 5 minutes. Add salt and pepper if required. Lower heat. Mix starch solution, pour slowly into soup and stir till thickens.
3) Add in ham, drizzle eggs on the soup. Wait a short while before stirring again.
4) Serve with garnish.
Easy peasy, almost effortless and you can have your soup ready in no time. Letting the eggs to rest a while in the soup before stirring gives you chunkier bits of egg drops. This recipe will yield quite a big pot of soup. My kids and I are 'soup-people', so usually we have seconds. Also, I will also save it for next day's breakfast. The original recipe does not call for enoki mushrooms. I added them based on a couple of factors; one of them is adding texture. After cooking, the enoki mushrooms do not lose their crunch. I'd like to think of it as a substitute to sharks' fins. I occasionally attend vegetarian banquets and they usually substitute sharks' fins with 'tang hoon'. While it does resembles sharks' fins, the texture is nowhere near. So I told Ah Girl that this is mommy's 'poor man sharks' fins soup'. She then went on telling me why we shouldn't eat sharks' fins, to my delight. Seems that they are teaching eco-awareness early in school now.
Wednesday, October 6, 2010
Corn Soup
Tuesday, July 14, 2009
Fluffy Pancakes

Am guilty of spending too much time on Facebook with my new found farming ambition. I have 5 or 6 virtual farms, imagine that! But really, it's my real plants that needed tending. They are all not growing well due to my neglect. I hope I will be able to find time this weekend to have them fixed. That's after spending some baking time with Ah Girl. She's been sulking about not being able to bake cookies with me.
Anyhow, I would like to share this lovely recipe which I tried out at Kitchen Capers, provided by Carrie. The recipe yields really soft and fluffy pancakes. I have had my share of tough pancakes, some with strong soda bicarbonate aftertaste. These are really good! Some compared them with MacDonald's Hotcakes. I'm not sure as I haven't had Hotcakes for quite some time. But, homemade is always best. You know what goes into them and you can pair them up with stuffs you like. I used the Salted Caramel which I made previously and bananas. My kids ate them with honey. I believe they will taste great with blueberries too; they are in now.
I re-shuffled the sequence of the ingredients slightly.
Fluffy Pancakes
Ingredient
100g Self Raising Flour, sifted
A pinch of salt
75ml milk
2 Egg Yollks
1tbsp vegetable oil
1/2 tsp vanilla essence
2Egg Whites
2 Tbsp caster sugar
Some butter for greasing
Method
1) In a mixing bowl, mix sifted flour and salt together. If preferred, you can whisk the flour in the bowl instead of sifting.
2) Using a measuring cup, measure milk, add egg yolks, vanilla essence and oil. Stir well. Make a well in the center of flour, pour in the mixture and stir into a smooth batter with a whisk.
3) In another bowl, whisk egg white with sugar till stiff. Stir in 1/4 of the egg whites to the batter to lighten it, then fold in the remaining egg white carefully till incorporated.
4) Heat up a non-stick frying pan (low heat), grease lightly with butter. Drop a small ladle of batter (depending how big you want your pancakes to be) in the pan. Flip the pancake only when bubbles appear. Fry till golden brown. Serve hot with fruits, jams, honey, maple syrup etc.
*Note : Batter should be thick.
**Note : Recommend to double the recipe. The pancakes will not turn hard even when cold.
じゃね~~
Wednesday, February 11, 2009
Chikuzen Ni (筑前煮)

This is a late post on what I did New Year's Day. I didn't have time then and after posting 7 Vegetables Soup (七样羹) , I thought I should post this as well. In some ways, Japanese and Chinese cuisine have their similarities. Chikuzen Ni is usually cooked on New Year's Eve and consumed on New Year's Day. This allows the flavour to infuse thoroughly. This dish uses at least 5 or more types of vegetables, usually in 5 different colours. Traditionally, the vegetables used are; Satoimo (里いも, Taro), Ninjin (にんじん, Carrot), Renkon (れんこん, Lotus Roots), dried Shiitake mushroom (干ししいたけ), Take no Ko (竹のこ, Bamboo shoots), Gobo (ごうぼ, Burdock) and Kinusaya (きぬさや, Snow Peas). The vegetables are cooked with chicken and konnyaku (こんにゃく).
I usually cook up a Japanese fare on New Year's Day. As mentioned in earlier post, I didn't have time for an elaborate meal, so I opted to cook this dish instead. This year, I found these radish in the wet market.
Believe it or not; like Chinese, Japanese like auspicious colours like red and yellow too. So in their New Year's dishes, they will include auspicious colours. I adjusted the recipe I had as I did not have Taro, Konnyaku and Burdock. I used Daikon (大根, radish) and Imo (いも, potatoes) instead.
Chikuzen Ni (筑前煮)
Ingredients
1 Chicken Breast, remove skin, deboned and cut into cubes
12 No.s of dried Shiitake Mushrooms, soaked, squeeze dry (retain water) and quartered
2 medium size Potatoes, peeled and cut into cubes (original : 12 small baby taro, peeled and rub with some salt, wash)
2 medium size Carrots, peeled and cut into cubes
2 small Red Radish, peeled and cut into cubes (original : 100g Burdock, peeled, cut into short length and soak in vinegar solution)
100g Lotus Root, sliced and soak in vinegar solution
100g Bamboo Shoots, cut into chunks
*1 slab of Konnyaku, break into pieces by hand or scooped using melon scoop* (optional)
3-1/2 cup Dashi Stock and water from soaking dried mushrooms
3 Tbsp Sake
6 Tbsp Sugar
3 Tbsp Mirin
5 Tbsp Shoyu
Some oil
Some Snow Peas
Method
1. Heat up a pot, add oil and sear the chicken chunks slightly. Add all vegetables, except snow peas and taro (if using) and stir fry for a short while.
2. Add stock and bring to a boil. Remove scum if any. Add in all seasonings and turn heat down to a simmer. Simmer for about 30 minutes or till the root vegetables have softened. Add in snow peas just before serving.
Enjoy!
Monday, February 2, 2009
7 Vegetables Soup (七样羹)

Yesterday was the 7th day of the Chinese Lunar New Year, also known as 人日. It is said that on this day, humans were created. Thus it is considered as everyone's birthday. In Singapore, on the 7th day, we eat 'Yu Sheng' (Yu Sang or 鱼生). It is a cold dish, served with various type of shredded vegetables (radish, carrots, turnips, etc.) and raw fish (usually salmon or 西刀鱼). They are then tossed with oil, plum sauce, five spices, peanuts, sesame and crackers. People also call this 'Lo Hei' (捞起), symbolises 'prosperity' (捞得风生水起), not in terms of waistline of course.
For us, on the seventh day of Chinese Lunar New Year, my family will also cook this soup (七样羹) , made up of 7 types of vegetables and more. I am not sure if all Teochews do this but my family does. So to keep the tradition alive, I would want to blog about this soup. 羹, should be thicker than soup, however, my mom and me seldom cook till the soup is thickened. This would mean hours of cooking and the nutrition values of the vegetables will be gone by then. Normally, we will cook this dish with pork ribs. But this year, I am not required to do any cooking on New Year's Eve or New Year's Day, I did not stock up my fridge. The butcher was not open so I used chicken breast instead.
Below are the 4 must have ingredients in this soup. The other 3 or more, you can add in as you like. I used kale, chinese leeks, cabbage and carrots this year. You can add radish, mustard greens too.
Bai He Cai (Bek Hak Cai, 百合菜) They are only available once a year during Chinese Lunar New Year. It symbolises unity in family.
Chun Cai (Chung Cai, 春菜), they are too, available only once a year but can still be found 2 to 3 months after Chinese New Year. I'm not too sure what it symbolises, spring, perhaps?
Chinese Celery (芹菜)symbolises being industrious and spring onions (葱)symbolises smartness (聪明).
Radish or carrots (白菜头/红菜头) symbolise 好彩头 (auspicious beginning). Chinese leeks (蒜)symbolise 有的算 (wealth to count).
It is just a humble dish with lots of good intentions in it. After 7 days of feasting, it is also time to detox our body. I usually take this soup alone with nothing else.
7 Vegetables Soup (七样羹)
Ingredients
1 Chicken Breast, remove skin, cut in chunks and marinate with salt and pepper
2 stalks Chinese Leeks, sliced
1 medium size Carrot, cut in chunks
1/4 cabbage, cut roughly
2 stalks Bai He Cai, cut into lengths
2 stalks Chun Cai, cut into lengths
1 stalk Kale, cut into lengths (the one I bought was huge)
1 stalk Cilantro, cut into lengths
1 stalk Spring Onions, cut into lengths
2 litres Water or Stock
Salt to taste
Some olive oil
Method
1. Heat up a pot, add oil and fry the leeks and sear the chicken chunks slightly. Add in water or stock and bring to a boil.
2. Remove scum and add in carrots and cabbage. When they are slightly softened, throw in Bai He Cai, Chun Cai and Kale.
3. Bring to a boil and simmer for about 10 to 15 minutes. Season to taste, add in cilantro and spring onions and turn off the heat. Serve hot with rice or as is.
I have another recipe coming up; Chikuzen Ni. The similarities are; these 2 are New Year's Day dish (well, Japanese New Year is on 1st January) and uses loads of vegetables. Definitely not for carnivores. Stay tuned. それじゃ~~
Wednesday, January 21, 2009
Tips for Making Pineapple Jam
This post is rather late as the lunar Chinese New Year (CNY) is just 5 days away. I have been busy with my orders and couldn't find time for this write up. Stealing some time now to get this done. I hope this post can be of some help this year or the next CNY.
For those who want to cook pineapple jam instead of using store bought jam, here are the tips I have gathered from my own experience. Below is a list of pros and cons of cooking your own jam.
Pros :
1. No preservatives and stabilisers
2. No flour added to thicken the jam
3. You control the sweetness of the jam
4. You control the consistency of the jam
5. You control what spices you want to use and how much you want to use
Cons :
1. Prepare to stand at stove for at least 2 hours
2. You sweat buckets
3. Risk getting scalded
4. You don't know when to stop cooking the jam
5. Risk burning the jam
6. You need to hand-grate the pineapples
I have never used store bought jam but the feedbacks I got from friends who do, weren't that great. Either the jam is not fragrant enough, no bite, too hard and dry or too sweet. Based on these feedbacks, I will explain why I did my pineapple jam my way.
There are many pineapple jam recipes online, so I won't elaborate here. The basic recipe is of course, pineapples, sugar and spices, if you like. You shouldn't add flour to thicken your jam at all. Taste is subjective to each individual so do not follow the recipe blindly.
Things you need to cook pineapple jam
1) Stainless steel or glass bowl (to collect grated pineapples)
2) Stainless steel or glassware for cooking
3) A wooden spoon (I dedicate 1 wooden spoon solely for cooking pineapple jam
4) A grater
5) A pair of gloves (to protect your hands from the acidity)
6) A corer or back of spoon to 'blind' the pineapples (I dig out those 'eyes' instead of cutting)
7) A lot of patience
8) Water to hydrate yourself
9) Some upbeat music for this monotonous work (at times, I sing along with Enka too)
*Picture Added

Fragrance
Many recipes likes to use unripe or half-ripe pineapples. My personal concoction uses half-ripe and ripe pineapples. Half-ripe pineapples will provide the 'bite' while ripe pineapples will provide the fragrance. Just like cookies and cakes will emit the aroma to tell you they are done, ripe fruits give out fragrance to tell you they are ripe and ready to be eaten. If you cook unripe, half-ripe and ripe pineapples separately, you'll get what I mean. Also, I do not strain the juice of the grated pineapples. Yes, it will take longer to cook the jam, but the full flavour is retained.
Spices
I used cinnamon and cloves for my jam. Traditional Nyonya pineapple tarts use star anise too. Alhough I might have some minute Nyonya blood somewhere along my ancestral line but I am a Teochew too. And to Teochews, we use star anise for braised duck or pig trotters. So I never gotten use to the idea of adding star anise. If you dislike the smell of these spices, you can just cook the jam with sugar. But at least give the cloves a go; it does go very well with pineapples. I will use 2 cloves for 1 pineapple.
*Picture added
Bite
As mentioned, half-ripe or unripe pineapples will give you more fibre, thus the 'bite'. Do not blend the pineapples with a food processor, always use a grate to grate it coarsely. During cooking, the grated pineapples will dehydrate and shrink. Do not grate the core of the pineapples in attempt to increase the volume. The core even after being grated, will remain quite coarse and fibrous. Personally, I do not like the texture.
Sweetness
Cooking fruits can be tricky as they have sugar content. Though pineapples are mostly sour, it does contain sugar. During heating, it will break down to fructose. When the juice evaporates, the fructose will be left behind. Adding sugar is a must to preserve the jam. I usually add 70% of the sugar the recipe stated and taste the jam before slowly adding more sugar if required. I used 65g of sugar to 1 pineapple as a guide. I only add sugar when the pineapples started to dry up. The chemical composition of sugar is made of of Carbon, Hydrogen and Oxygen. When heated, sugar will breakdown in to water and carbon, thus causing the jam to caramelise. The jam should be sticky with a golden hue. It should not be too dark.
Done-ness
The tricky part of cooking the jam is knowing when to stop. If you are making an open-faced tart, you need the jam moist. If you are making closed tarts, the jam cannot be too wet or it will be difficult to handle during wrapping. For me, I am clumsy with closed tarts. I only make open-faced tarts. I cook the jam till it coats the wooden spoon and the jam doesn't fall off the spoon immediately. However, when you flick the spoon, some jam should fall off. I'm sorry if you find this description vague. You need to cook it to experience it. After the jam is being cooled, remove the spices and store the jam in a container. It should be refrigerated till ready to use.
*Update*
In my haste yesterday, I forgot to mention that you should use a pot which is wide. The bigger the area, the faster the evaporation. This will help to cook the jam faster. But don't go greedy and cook too much jam at a time.
Have fun! 頑張ってね~~
Monday, January 12, 2009
Tsukune

Ah Girl loves Tsukune sold at Tori Q's. It's a good sign as she isn't very experimental with food. I'm glad that she has taken to Japanese food well. She will ask for Teriyaki Chicken or Salmon or Tsukune repeatedly. And with that, she could eat more. Usually on New Year's day, I will cook Japanese food. We went out on New Year's day, there wasn't enough time to cook O-Zōni (雑煮) or Toshi Koshi Soba (年越面). So instead, I made Chikuzen-Ni (筑前煮) and Tsukune (つくね). These 2 dishes are quite easy to prepare. While Chikuzen-Ni is a typical New Year's day dish (not restricted to), tsukune can be eaten all year round. It is especially popular with children and served as a side dish at drinking sessions. It can be shaped into balls then skewered or it can be pan fried as patties.
For those who requested for the recipe, here's how I make these.
Tsukune (つくね)
Ingredients
For meat balls :
300g Chicken, remove skin and fats, deboned and minced (I used drumsticks, thigh and breast meat)
1/4 White Onion, chopped finely (optional)
2 Eggs, medium sized
1/2 Tsp Salt
1 Tbsp Plain Flour
1 Tbsp Corn Flour
7 tbsp bread crumbs (panko)
1 inch section of ginger, grated and extract juice
For sauce たれ :
4 Tbsp Sake
5 Tbsp Shoyu
2 Tbsp Mirin
2 Tbsp Sugar
1 Tsp corn flour
2 Tsp water
Method
1. Soak skewer in water before preparing ingredients.
2. Mix all ingredients for meat balls in a bowl and set aside for 20 minutes.
3. In a pot, add 2 cups of water and bring to a boil. Wet your hands and shape the meat balls into desired size and drop them into boiling water.
4. Cook for about 7 minutes or when the meatballs float to the surface. Remove and drain.
5. Preheat oven to 200 deg.C. When meatballs are cool to touch, skewer them, 3 to 4 balls in 1 stick. Grill the meatballs, turning them after 4 to 5 minutes. Brush the sauce and grill. Repeat process at least twice. Remove and serve with shichimi (七味) powder or serve as is.
Do give this recipe a try. It's cheaper to make these yourself than buying them. Moreover, you know what exactly you are giving to your children.
Happy Cooking~~ じゃね~~
Friday, December 26, 2008
Christmas Dinner

Year after year, I swear to myself I will not cook Christmas dinner. Yet, every year, I still do. Darn. I must be quite happy torturing myself. This year is kind of stressful as Christmas fell on a weekday. I was really undecided whether or not to cook but I relented in the end. I started brining the chickens on 23rd and sent my helper to get the stuffs ready. I had wanted to try out Terri's Chestnut stuffing. I didn't have time to go to the market on weekdays so I sent my helper. When she happily reported she got hold of the chestnuts, I was quite glad. The supermarkets are selling a can of chestnut puree (about 400g) for S$8.95. When I saw what she bought, I realised I must have been communicating in Martian. She bought water chestnuts. Okay, something must have gone wrong with my description. I told her chestnuts have brown shells and hard but I forgot to tell her they don't come in brown skin and covered with mud.
So with Terri's recipe, I did some damage control and turned it into mushroom stuffings. I roasted 2 chickens instead of a turkey. It's the same effort and since my oven can roast 2 chickens at a time, I offered to cook dinner for my parents. The result is slightly better than my previous attempt of roasting a whole chicken. I have taken a cue from Terri , to cover the chicken with aluminium foil in the initial stage of roasting. Perhaps I still have to get acquainted with the oven. The tips of the wings got burnt but having roasted the chicken breast down, the meat was rather juicy and tender. I stuffed the chickens and truss them. During roasting, the stuffing oozed out a little, making it look like the chickens are pooping. It was quite amusing actually so I asked Ah Girl to watch it. Oops, I hope the description doesn't spoil your appetite.
Mushroom Stuffing
Ingredients
400g Potatoes, boiled
80 g grated cheddar
1 Tbsp Butter
250g Brown Button Mushroom, diced finely
1 large Onion, chopped
2 sticks Celery, diced finely
1 Granny Smith Apple, diced finely
2 Tbsp Vodka (and a few swigs if stressed, I did)
120g day old bread, cut into 1 cm cube
1 Egg
1-1/2 Tsp Sage (crushed)
Salt, Sugar & Pepper to taste
Method
1) Mash the potatoes and cheese and set a side.
2) In a frying pan, add butter and onions, fry till slightly browned. Add on mushrooms, celery and apple. Season to taste and fry till quite dry. Add vodka and turn off flame.
3) Set aside to cool and add bread, egg, sage and mashed potatoes.
The chicken is accompanied by pumpkin soup and salad with yoghurt. I was too tired to take pictures of those. The stuffing is slightly too much for 2 chickens. I baked them in tartshells and turned out to be quite delightful.
After dinner, it's dessert time. That was when my dear girl commented that I am her chef and waitress. Thank you very much but I much preferred to be waited on. I made 2 snowman. 1 frosty found home at my parents'.

Frosty looking a little sinister after being lit up.
I also made some mince pies but I'll save the recipe for another time.
And yes, I survived another Christmas dinner! As for New Year's dinner, I'll just stick to stir-fries or sushi.
Tuesday, November 11, 2008
Chirashi Zushi

Chirashi Zushi (ちらしずし), also known as 散寿司 is the ultimate Japanese party food if you asked me. There is actually no strict rules in preparing this and can be very versatile. All you need is sushi rice and various toppings that you like, may it be raw or cooked. If you want to prepare raw fish, just make sure they are fresh and properly chilled. If you use a nori sheet, you can make them into Maki rolls (卷き) or Gunkan (军舰).
I usually serve this like buffet-style. I will prepare all the toppings and lay them on the table. The guests will just choose what they want on top of the rice. For the above, I prepared the following (clockwise) :
1. Prawns
2. Grilled Unagi
3. Shredded Egg Omelette
4. Sakura Denbu
5. Flying Fish Roe
6. Nori Strips
7. Crabmeat
8. Salmon Roe
9. Cucumber Slices
10. Julienned Takuan (pickled radish)
The most time consuming preparation is the prawns and crab, especially the crab. I had to steam then de-shell them. It can be quite tough if you don't have the right tool. There is a type of scissors for crabs but since I don't have it, I used a satay stick to help me. I didn't prepare any raw fish unfortunately; 1) I don't have a sharp sushi knife for cutting fish, 2) old folks don't take raw fish too well. A sharp knife is necessary for cutting raw fish, else it will leave the slices unappetitising and it is a shame to waste good, sashimi quality raw fish.
This is how I make my sushi rice.
Sushi Rice
Wash rice as per instruction on the package.
Cook 2 cups of rice with dried kelp (5cm length, optional) in rice cooker. Remove kelp after rice is cooked.
Vinegar mixture (This can be adjusted to your taste)
1/4 Cup of sushi vinegar
2-1/2 Tbsp fine sugar
2/3 tsp of salt
Method
1) Stir the vinegar mixture till sugar and salt dissolve. Sprinkle some vinegar mixture onto big mixing bowl (use glass ones, no plastic or metal).
2) Scoop out the hot rice into the bowl. Sprinkle the vinegar mixture on the rice, using a rice scoop to stir well. In another hand, use a fan to fan it (or you can mix the rice in front of the electric fan). Remember not to mash up the rice. When done, cover the rice with a damp cloth.
I much prefer arranging the ingredients using a square container.
じゃね~~
Friday, August 8, 2008
Meat Stew

I remember cooking this dish during Home Economics class when I was 13. All of us were very eager to have our first cook out without the supervision of our moms. Moms being moms, I think you will find these words familiar. 'Don't mess up my kitchen, clean and wipe properly, watch how you hold the knife, why you cut up the vegetables like that... etc.' Well, or that's just my mom? Time flies. The first digit now progressed from 1 to 3. Eek!!
I have fond memories of the Home Economics class back then (this makes me sound really old). I learnt how to sew a dress and a skirt. Those were the 2 pieces that spoke to me that I do not have the makes of a seamstress. I faired pretty well in the kitchen though. I would proudly bring home whatever I cooked/baked. Probably didn't pass mom's standard but she was polite enough to say nice. Some of my friends would however, give their bakes to guys whom they secretly/openly liked. My rationale then was that; since my mom paid for the ingredients, she had the rights to it. Perhaps, I did like some guys back then, but that doesn't mean I have to feed them right? Their mommies would do that!
Anyhow, I didn't have time to cook a proper dinner after running around and making a cake on Saturday. I was also sick of eating out. So I decided to cook this meat stew as I remembered requiring minimum ingredients, minimum attention, simple 1 dish meal. So while I left the cheesecake to set in the fridge, here's what I did.
Meat Stew
Ingredients
400g Lean Pork, cubed
3 Medium size Potatoes, peeled and cubed
2 Carrots, peeled and used 乱切法
1/2 White Onion, peeled and quartered
1 Tbsp Butter
2-1/2 Cups Water or Stock
1 Tbsp Cornstarch + 3 Tbsp Water
Salt to Taste
Pepper to Taste
Method
1) Marinate pork with salt and pepper and leave aside for at least 1 to 1-1/2 hours.
2) Heat up a pot, add butter, onions and pork. Add vegetables when the pork starts to browned. Stir fry for about 2 to 3 minutes. Add water, bring to boil then reduce to a simmer.
3) Let it simmer for 45 minutes to an hour. Season to taste and add cornstarch solution to thicken. Serve hot with rice or bread.
Super easy! I wonder what they are teaching for Home Economics class these days.
Friday, August 1, 2008
Tom Yam Chicken Puff

This is my first attempt of using puff pastry, storebought of course. I remembered my sis, S, attempted making puff pastries. or did she? Must be getting old, can't remember. These days my memory is failing me. I got myself a small note book to jot down thoughts, notes and events. The thing is that; I am not very disciplined in this area either. I would forget to to write it down or I would forget to look it up in my note book. Worse, at times, I don't even remember where the book was! Back to puff pastry. I always have this conception that puff pastry requires skilled hands to make and pastry magarine is needed.
While participating this challenge, I did a reseach on puff pastry on stumbled upon this site. The method seems easy. For the challenge, we are supposed to incorporate puff pastry, meat and canned fruits into the main dish or using them together in a main and a side. To be honest, my mind went blank. Whatever creative juice I had or rather, if I had any, were dried up. I procrastinated till it passed its deadline. No one seemed to remember. .... Then they decided to extend the deadline....
.... Looks like there is no escape. Still, I waited till last Sunday and came up with this Tom Yam Chicken Puff. It's like a no brainer to me and I am rather embarassed about it. Of course, due to last minute, I had 'no time' to make the puff pastry from scratch so I got myself a pack of frozen pastry from the 'Shop N Save' nearby. They have this intersting French Apple Pie recipe printed on the package. I was really tempted to make that instead.
I did not make the Tom Yam paste either. I got it from Gina and the recipe can be found here. I am rather pleased with the paste. Since it is homemade, it is free of preservatives, colourings and what-have-yous. It has this bright orange hue unlike those I have bought in the past, a darker mass. I used it on poultry, seafood and even fried rice! This is how I put the puffs together.
Tom Yam Chicken Puff
Ingredients
1/4 Onion, chopped
1 Chicken Breast (300g), skinned and de-boned, cubed
60g Tom Yam Paste (I have them portion and pre-packed)
4 Tbsp Canned Pineapple Syrup
150g Canned Pineapples, drained and cubed
1 - 2 Stalks Scallions, chopped
3 - 4 Stalks Cilantro, chopped
1 Block Frozen Puff Pastry, thawed
2 Tsp Mushroom Sauce (Vegetarian)
1 Tbsp Corn Starch
Salt to taste
Pepper to taste
Some Olive Oil for frying
1 egg, lightly beaten
Method
1) Marinate chicken with mushroom sauce, salt, pepper and cornstarch for 1/2 to 1 hour.
2) In a frying pan, heat oil and fry onions till fragrant. Add in chicken and fry till meat changes colour. Add tom yam paste, syrup and pineapples. Turn on high heat and fry till ingredients are dry. Turn off heat and stir in scallions and cilantro. Leave aside to cool.
3) Roll out the pastry on a lightly floured surface. I rolled it to about 2 mm thick. Cut it into desired shapes and sizes (I cut it into rectangles by estimation). Scoop the cooled ingredients onto the pastry,, fold and seal the sides tightly.
4) Preheat the oven to 210 deg.C (for fan oven). Apply egg wash on the pastry and bake for 15 to 20 mins, or till nicely puffed up and golden brown.
*Note : I can take spiciness relatively well and it also depends on the spiciness of the tom yam paste you have. You might want to go with caution for the amount of tom yam paste used.
It's a change from the usual curry puffs. They are sweet and spicy at the same time. The robust flavours just burst in your mouth. I think I can use this combination for fried rice next.
それじゃ~~
Monday, July 28, 2008
Baked Rice

Ya... I've been slacking. Hee~~ managed to watch some J Dorama and was hooked on the hunks storyline hunks storyline. *Ahem~~ A couple of posts were sitting there waiting for the write up but I'll just leave them alone for the time being. I'll tell you why later. Anyhow, I was inspired by Cook Bake Legacy in her recent post of Baked Rice. It is a good way to use up leftovers, rice especially instead of the usual fried rice.
Why do I keep emphasising the use of leftovers? We live in a time where food is abundance but that is about to change. As some farmers see growing crops for biofuel is getting more lucrative, food crops are affected. The food prices are being pushed up, it is a world wide problem. Wasting food is not an option. We tend to buy/cook more than necessary. I remembered my mom telling this; finish your food (rice) else your future husband will be pock-marked. Hmm~~ maybe I didn't do as she said, that's why IH's face...
Okay, I digress. I am writing this down so Ah Girl will know, '谁知盘中餐,粒粒皆辛苦'. I will refrain from using this same scare tactics or something along the line however tempting. I have some salmon bellies and canned pineapples left in the fridge. Instead of using cream of XXX soup, I thought that some tomato sauce will take some of the fishy smell away. As the rice was abit dry, I added a layer of mushrooms on top to keep the rice moist. So this is my version of Baked Rice, using whatever I had on hand.
Baked Rice (Serves 4)
Ingredients
4 Eggs, lightly beaten
250g Salmon fillet
1 Tbsp Minced Garlic
1/4 Onion, chopped finely
4 bowls Cooked Rice
1 Cup Mixed Vegetables
150g Canned Pineapples, cubed
100g White Button Mushrooms, sliced
1/2 Can Tomato Puree (about 180g)
200g shredded Cheddar Cheese
Some Olive Oil
Salt to taste
Pepper to taste
Method
1) Heat up a wok, add oil and fry the eggs and scramble them into bite size. Remove from wok and set aside.
2) Pan fry the salmon till cooked, mash them up and set aside.
3) Heat up the wok, add oil and fry onions and garlic till fragrant. Add in mix vegetables and fry for about 1 minute. Add in the rice to stir fry and season to taste.
4) In a 8 x 8 inch aluminium cake tin, mix rice, salmon, eggs and pineapples together. Lay sliced button mushrooms on top and spread the tomato puree. Sprinkle cheese on top.
5) Bake the rice in a preheated oven at 180 deg.C for 20 mins or till the cheese melted and browned slightly.
*Note : Alternatively, you do not have to fry the rice, just mix it with the cooked ingredients and bake.
If you have not noticed, I usually do not put down the amount of seasonings required. This is because, I do not measure them. I also seldom weigh my ingredients as I usually cook according to feel and taste. As a result, some of my posts in the draft folder will suffer. Unlike baking, I don't record them down as I go along. So, either I try to recall what I did or they will get deleted in time. I think I need to get used to the habit of writing things down as this is one of the purpose of having this blog.
じゃね~~
Tuesday, July 22, 2008
Hong Zao Chicken
Finally. I was able to savour the fruit of my labour. I harvested my Red Glutinous Wine some time back. After distributing to family and friends, I stash some of it for myself (*sshhh~~). I needed to know if the wine is up to mark, To be honest, I did not have Hong Zao Chicken (红糟鸡) for both of my confinements. First of all, my helper does not know how to cook the dish. I am a Teochew and I seldom eat this dish. So I myself do not know how to cook it too. I wasn't very sure where to buy the wine lees too. Some of my friends discouraged me from taking too much alcohol during confinement since I was breastfeeding. Thus I did not have the chance to spike Ah Boy's milk to make him drunk sleep.
When I handed my friend, M, Ah Boy's first month cake, she treated me to a bowl of 红糟面线 (Mee Suah, also known as wheat flour vermicelli). Aiya, it was then that I realised what I have missed. That was why I started this journey of wine making so that she wouldn't miss out this dish for her confinement. According to the mommies of the new mommies, Hong Zao cleanses the womb (Oh dear, is it too late to spring clean mine?). It was also found that Hong Zao is able to bring down the bad cholesterol level (Wikipedia), improves blood circulation and may prevent coronary heart disease.
This is how I did my Hong Zao Chicken (红糟鸡). I had it with Mee Suah on last Saturday. I had the leftovers with rice for lunch. Yums!
Ingredients
1 Chicken, about 1.6kg, chop into small pieces (I removed skin and trimmed off fats)
1 section Ginger, peeled and julienned
3 generous Tbsp Red Wine Lees
2 Cups Red Glutinous Rice Wine
3 to 4 stalks Scallions, cut into lengths
2 to 3 stalks Cilantro, cut into lengths
Marinade
2 Tbsp Ginger Juice
3 Tbsp Red Glutinous Rice Wine
1/2 Tsp Salt
Some Sesame oil
Extras
Some Sesame oil for frying
Salt to taste
Sugar to taste
Red Glutinous Rice Wine to drizzle
Method
1) Place all the chicken pieces in a heat proof bowl, pour hot, boiling water over chicken, Drain, marinate and set aside for about 30 minutes.
2) Heat up a wok, add sesame oil and ginger. Fry till fragrant. Add in chicken pieces to fry.
3) Add in wine and wine lees, season to taste and stir thoroughly. Bring to a boil, cover and let it simmer for about 20 minutes.
4) Toss in the scallions and cilantro just before removing from heat. Drizzle some wine, garnish and serve.
Wine making is interesting and it has grown on me. Currently I am on another 2 batches of Red Glutinous Rice Wine. 1 for a mommy-to-be and another for M's friend. I am willing to make this wine for mommies-to-be for free (or those who like Hong Zao). All I am asking for is that they pay for the ingredients (which is dirt cheap), provide me with empty glass containers for the wine and lees they will be getting in 21 or 28 days. Maybe say a prayer or two for my children if they cared to; alright if they don't. Err.. no, I'm not a Christian or a Catholic, in case you're wondering...
それじゃ~~
Wednesday, July 16, 2008
Homemade Pizza
Besides Japanese food, I enjoy Italian food too. I love cheese and associate cheese with Italian food, especially pizzas. Probably because when I was still at an impressionable age, I was sold by the Pizza Hut's advert. Hot, steamy, fresh pizzas with gooey, elastic pull of Mozzarealla cheese. Never mind my parents said that pizza cheese smelled like baby's vomit. Mozzarella, Cheddar, Edam, Parmesan, and Fetta are the few which I have tried and liked. I still have not pluck up enough courage to try blue cheese or goat cheese because I was told that they are rather pungent. And like Camembert and Brie, they contain the Penicillium strain of bacteria. I am allergic to Penicillin so I do not know if I should actually consume these cheeses. Maybe I should ask my doc.
Anyway, never thought that I would attempt making pizza myself. Probably because I am no longer attracted to Pizza Hut's pizzas. They looked good in the ad but what you get is hmm... The crust is usually thick unless you ask for thin crust. Having said that, I think I should not complain too much about the toppings. At least they have a wide variety of toppings. My sis went to Italy for holidays and discovered that when you order for a mushroom pizza, mushroom is all you going to get. There is no such thing called Hawaiian pizza. Perhaps Italians will shake their heads in disapproval when they see my pizza. Yes, I must admit, my pizza is terribly confused. But hey, since it is homemade, why stinge on the ingredients? At least my family preferred mine to storeboughts. Ahahah...
I made some salad to go along with the pizza too, Green apples, grapefruit, Butterhead lettuce and Lettuce Lollo Rossa are tossed together with some salt, juice of half a green lemon and 2 tubs of Meiji Yoghurt with Nata de Coco. I made 2 pizzas in 2, 10 inch by 14 inch rectangular trays, for this pig-out session. As this was my first attempt, I think the recipe I used was not meant for making thin crust pizza. However, I spreaded the dough rather thinly, so the end product wasn't thick. I made some pita bread for my mom too as she is not into cheese. I gave her some of the toppings to fill up the bread. I will put up the recipe for pita bread later. I do find them rather easy to make and rather similar to making the pizza crust. The recipe for the pizza crust is from Margaret Fulton's 'Book of Pasta & Pizzas'. Courtesy of my sis' stash of old recipe books given to me. I modified the recipe a little.
Homemade Pizza
Pizza Crust (yields 2 10 inch x 14 inch pizza)
Ingredients
4 Cups Bread Flour
1-1/2 Tsp Instant Yeast
1 Tsp Salt
1 Tbsp Honey
2 Tbsp Olive Oil
1-1/2 Cup Water
Toppings (as you like it)
1 Can Tomato Paste (Hunt's, 170g), dilute with some water
1 Can Pineapple Rings, cubed
1 Yellow Capsicium, cubed
1 Green Capsicium, cubed
1 Red Capsicium, cubed
200g Honey Baked Ham, remove rind and sliced
1 Chicken Breast, sliced and marinated with salt, pepper and cornstarch
1 Large Onion, sliced
300g White Button Mushrooms, sliced
500g Pizza Plus Cheese (a blend of Mozzarella, Cheddar and Parmesan) - I didn't use all
Some olive oil
Salt to taste
Method
1) In a mixer bowl, add flour, yeast and salt. Pour in honey, olive oil and water.
2) Using a dough hook, knead the dough on low speed for 10 mins. Lightly oil a bowl. Roll the dough into a ball and place in the bowl. Cover the bowl with cling wrap or damp towel and leave aside to rise for 1 hour or double its size.
3) While proofing, in a pan. drizzle some olive oil, stir fry the chicken slices. Remove from pan. set aside for later use. Heat up pan again. add oil and fry onions till slighlt browned. Add in mushroom , season to taste and fry till done. Set aside.
4) After proofing, transfer the dough onto a lightly floured surface. Kneads the dough for about a minute. Divide into 2 portion and roll into balls. Leave to rest for 10 minutes.
5) Lightly dust the tray with flour and roll out the dough. Spread out the dough evenly. Spread the tomato paste generously onto the dough. Pile the toppings, leaving cheese last.
6) Bake at 220 deg.C for 15 to 20 mins or till golden brown.
*Note : Cooking the chicken and mushroom first will prevent the dough from getting soggy. If you bake uncooked meat and mushrooms, they will sweat during baking.
**Note : You can use your own preferred toppings. I prepared more toppings as I need to leave some for pita breads.
Happy cooking! それじゃ~~
Monday, July 14, 2008
Potato & Leek Soup
My sis passed me a couple of old recipe books the other day, which I think are more than 10 year old. These books have been lying around the house for quite some time and somehow, I took them for granted. Previously, I had no interest in venturing into western cuisine as I find them a tad too troublesome, too time consuming to prepare. After concocting Pumpkin Soup by fluke, I am hooked on soup.
I made Potato and Leek Soup last weekend to accompany roast chicken and salad. For a balanced meal, you need protein, carbo and fibre. The roast chicken was relatively simple. Just marinate the bird with salt and pepper the night before, stuff onions and green lemon in it. I trussed it, rubbed butter all over it and laid streaky bacon on its back to save me from having to baste the chicken. I roasted the chicken breast down so that the breast meat will not be dry. Bake for an hour at 190 deg.C. Nothing to 'Wow' about, still need some improvement. Peeled of some skin whille removing the charred bacon. The bacon kept the back moist and does wonders to the flavour. Perhaps I should wrap bacon all over the bird? Hmm..
These days I have been making salads without mayonnaise or Thousand Island's sauce. I use yoghurt instead. I cut up some Fuji apples, oranges and mangoes, throw in a tub of Meiji Yoghurt with Aloe Vera bits. Toss with a pinch of salt and juice of half a green lemon, you get a nice salad (I was too lazy to go to supermarket to get greens). Again, nothing to 'Wow' about.
I picked out this soup recipe from 'Book of Family Meals' of Margaret Fulton. I find her instructions simple to follow. In a time where information and recipes are easily available online, I still love to hold a recipe book and go through it page by page. This book must be one of the earliest recipe books that we owned.
Potato & Leek Soup (serves 4)
Ingredients
60g Butter
4 Leeks, sliced
4 Potatoes, medium, sliced
1 litre Chicken Stock
1 Cup Thickened Cream
Salt to taste
Pepper to taste
chopped scallions for garnish (optional)
Method
1) Heat butter in a pot, add leeks and fry for about 10 mins or until softened. Add potatoes to stir fry a while.
2) Add in stock. Cover and simmer for about 30 minutes or until the vegetables are tender. Scoop out the potatoes and rub through a sieve. Use a blender to blend the leeks then pass through a sieve. Discard residue.
3) Combine the potatoes and soup mixture into a pot. Add cream and heat through. Do not allow to boil. Season to taste. Garnish if desired.
*Note : Original recipe calls for a pinch of nutmeg and chives for garnish (I didn't have). This soup can be served chilled too.
**Note : Do not use a blender to blend the potatoes though it is easier that way. The potatoes will become gooey (eew~).
IH asked why there was no bread to accompany this soup. Wah.. double dose on carbs, no wonder his waistline is expanding. Look who's calling fatty now? Did I mention that Ah Girl dislikes potatoes? The only potato product she consumed is potato chips, which I occasionally allowed. I thought I could fool her with this soup. I didn't think it tasted/smelled of potatoes at all. Somehow, she detected it and refused to take another spoon of it. Mission failed.
Thursday, July 3, 2008
Ham, Spinach and Mushroom Quiche
I made 3 quiches in 2 days over the weekend. What prompted me to make these was the conversation with my friend L. L, can't cook to save her own life and readily admits it. Her idea of cooking is pouring hot water into cup noodles. Her reason being; there will always be foodcourts, hawker centres and home delivery service. Sometimes, she would just call me up to ask me if I know of the recipe for a particular dish. When I offered to give it to her, she would decline. Last week, I finally know why she likes to call me up.
L : Do you know how to make quiche?
R : Nope, never made it before.
L : How can you not know? (sounds upset)
R : Huh? Is there a problem not knowing?
L : You are my idol you know?! How come you don't know how to make quiche?
R : .... .... Eh.. Aunty... since when did I become your idol?
L : How come you don't know? (still harping)
R : I haven't tried.
L : Why you never try?
R : .... .... (felt like hanging up at this point) Okay, I'll go try over the weekend and REPORT to you!
L : You try already let me know! I will tell ABC and XYZ that you know how to make quiche too!
R : .... ....
My dear L, thank you for showing me off to your colleagues and friends. While I appreciate that but I am not a celebrity chef, you can stop doing that. Please idolise Jamie Oliver, Nigella Lawson and many others. Your friend, me, could not have known every single recipe or cooked everything under the sky. Ahahah~
Unknown to L, I have always love quiche but procrastinated making one myself. One thing that deterred me was making the shortcrust pastry. I really dislike rubbing-in method and would avoid it at all cost. The only time I made shortcrust pastry was when I had to make Pineapple Tarts, so that's about once a year for Chinese New Year. I have another secret; that is I do not know how to line the properly to form an even and thin crust. This is my first attempt. Salmon, Spinach and Mushroom Quiche. I did not have a quiche pan so I used a tart pan instead.
Cross-section of it. The crust is thick in my opinion. And I find that the tart
The next one, I attempted with a cake pan. It was worse! I thought it would be better is I have some depth but I had problem spreading the dough out properly. Actually, getting the rolled out dough into the cake pan was quite a task.
Look at the crust! Horrid!
I would consider my first 2 quiches as a failure. Reasons being; Crust too thick, too much filling, too little egg custard.
My final attempt on Sunday.
Crust still unsatisfactory.
I still need to work on the lining of the crust but I would say the 3rd attempt was much better. I would prefer to use a deeper pan though to accomodate more egg custard. As IH did not want to have the quiche too rich, I did not add an extra yolk or any cheese to it. The recipe below is based on my trials. Thanks IH and helper for eating all the quiches I had made even though they are not up to mark.
Ham, Spinach and Mushroon Quiche
Shortcrust Pastry (makes 2 crusts, 8 inch tart pan)
Ingredients
300g Plain Flour, sifted
1/4 Tsp Salt
150g Chilled Butter, cubed
1 Egg Yolk
100ml Chilled Water
Method
1) In a bowl, add in flour, butter and salt. Use a pastry scraper to chop and combine the butter into flour until it resembles breadcrumbs.
2) Add in egg yolk and water, fold till it forms a dough. On a clean surface, knead the dough slightly.
3) Wrap with cling wrap and chill in the fridge for 30 minutes.
4) Roll out the dough on a slightly floured surface, roll out till it has even thickess. Transfer the dough onto the tart pan. Press the dough against the side of the pan and trim off the excess.
5) Poke some holes on the dough using a fork. Blind bake for 10 minutes at 210 deg.C.
*Note : The pastry can be prepared beforehand. 2 options : 1) Baked then freezed. 2) Freeze the extra dough for later use.
**Note : I used the pastry scraper to chop and fold the flour instead of using the usual rubbing-in method. Works too!
*************************************************************
Fillings (for 1 quiche)
Ingredients
80g Spinach, chopped
80g White Button Mushrooms, sliced
1/2 White Onion, sliced
Some oil for frying
Salt to taste
Sugar to taste
50g Honey Baked Ham, remove rind and cut
Method
1) In a pan, add oil and fry the onions till soft and slightly browned. Add in mushrooms and spinach. Season to taste and fry till vegetables are soft.
2) Leave aside to cool, squeeze off excess water.
3) Arrange the vegetables onto the crust and top with ham. Press the ingredients down slightly.
*************************************************************
Egg Custard (for 1 quiche)
Ingredients
90ml Full Cream Milk
90ml Thickened Cream
1 Egg
Salt to taste
Pepper to taste
Method
1) Add all ingredients into a measuring cup and season to taste.
2) Pour into the prepared crust and fill up as much as possible (usually up to 80% but no harm filling up to 90%).
3) Bake the quiche at 180 deg.C for 35 minutes or till the custard sets.
So you see my dear L, I really have nothing for you to idolise about. Thank you for overlooking my weaknesses. Most importantly, being there for me when I needed you. I am not one who take the initiative to make contact but you made the effort to keep our friendship going. 13 years is a long time but I am looking forward to more years to come.
それじゃ~~
Wednesday, June 25, 2008
Braised Lion's head
Another dish which I do not understand the meaning behind its name. Why is it called Lion's Head? Perhaps the vegetables around the meatballs made it look like a lion's mane? The meatballs are supposed to be made to the size of a fist. But I made them into bite size instead. Also, I added more variety of vegetables like carrots and Enoki mushrooms. The original recipe only called for Chinese cabbage (白菜).
Back in the late 80s and early 90s, watching TVB serials was hip. I picked up Cantonese from those dramas that I watched. My Cantonese is still fluent till this day so you have the idea how hooked I was then (my craze now is still Japanese drama). I think I first got to know this dish was through one of those dramas. I remembered the leading lady cooked this for her husband or something. I didn't really get to see how the dish looked like or how they prepared it because the drama was not food-related. The name of the dish was intriguing enough for me to look out for it in a recipe book. Sharing the recipe from an old recipe book that killed the curiosity of mine years back . I made these several times and received positive reviews so far. I later learned that this is a Shanghainese dish. Well, I learnt this from a Taiwanese cookbook. thus I really do not know of the authencity. Perhaps, some good Shanghainese souls out there can share with me? I will be very glad.
Braised Lion's head (红烧狮子头)
Ingredients
(A)
300g Minced Pork
1 Stalk Bok Choy, chopped finely, squeezed dry
Salt to taste
Sugar to taste
1/2 egg, beaten
1Tbsp Corn Flour
Oil for deep frying
(B)
600ml Water
1/2 White Cabbage, cut into sections lengthwise
1 Carrot, sliced
120g Enoki Mushrooms
2 Tbsp Light Soy Sauce
Salt to taste
Sugar to taste
Method
1) In a bowl, mix (A) together and stir well in 1 direction. Heat up oil in a deep frying pan. In 1 hand, squeeze the minced pork through your thumb and forefinger. Use an oiled spoon to scoop the meatballs and lower into the hot oil. Deep fry till golden brown. Drain away excess oil.
2) In a pot, bring water to boil and add in all vegetables. When the water comes to a boil again, add in the meatballs, soy sauce and season to taste. Lower heat to a simmer and cook for 30 minutes.
IH wants to put this on the menu on a regular basis. I cook what, you eat what lah.. don't think too much... Looks like I won't be cooking this again any time soon. Hah~
Happy cooking! それじゃ~~
Tuesday, June 24, 2008
Kam Heong Lala
As I mentioned earlier, there is this Masak Masak Challenge going on. And this time, the theme is to budget food for 4 adults not exceeding S$15. Well, at times like this, with food prices going up, it does help to exercise some budget planning. I actually wanted to do a one dish meal for this challenge but when I passed by the seafood stall, the Lalas are beckoning to me. A quick calculation to make sure that it is within the budget, I got myself a kilogram of it for S$3. Quite cheap one might say but consider most of the money goes to the shell.
I have always wondered why Lalas are being called Lalas. This shellfish is a clam but I do not know the actual name for it. We Teochews called it 白仔 which is even more strange. Anyways, I usually cook this with some chilli, Thai basil and bean paste (豆酱), or just dump them in soups. Although they would make rather nice stock as they are sweet and flavourful but it will turn the soup rather milky in colour. Some time back, I blog hop to Sweet Jasmine's and found another way to cook it. What does the name of the dish mean? I am still trying to figure out. Ever wonder how I jot down recipes? I do not print them out. I usually write them on a cue card.
Very simplified, right? I usually group the ingredients that are use in the same step or required the same attention together. It is easier for me to work this way. So thanks Jasmine for the recipe! It's a change for me actually. I seldom attempt recipes that require curry powder. It makes me sneeze alot. Do not laugh when I say I had to use a wet hanky to cover my nose while I cook this (I have no mask). I think I might really need one when I attempt my first curry chicken. I do make a mean Japanese curry though. Perhaps curry cubes are different?
To prepare the Lalas, soak them in a basin of water before cooking. Add some salt to the water. How to know if the Lalas are alive? I will try to pry open the shells (do not overdo it, you'll kill them before they make it to the wok). If it is clammed shut, it is still alive. I much prefer this preparation then discarding them when they do not open after cooking. Sometimes, due to the size of the Lala, the bigger ones might need longer time to open and the heat in the wok might not be evely distributed. This way, it ensures that every clam that goes to the wok is edible.
Kam Heong Lala
Ingredients
2 Tbsp Dried Shrimps, soaked, drained and chopped
1 Tbsp Garlic, chopped
1/4 Red Onion, peeled and chopped
1 cm thick Ginger, minced
1 Red Chilli, chopped
3 Sprigs Curry Leaves, washed
1 Tsp Fish Curry Powder mixed with 1 Tbsp Water
Some Olive Oil
Salt to taste
100ml Water
1kg Lala, soaked, scrubbed clean and drained
Method
1) In a wok, heat up oil, add in dried shrimps, garlic, onions and ginger. Fry till fragrant.
2) Add in curry leaves, curry paste and chilli and fry till fragrant. Add in Lalas and stir fry for a minute.
3) Add in salt to taste and water. Cover lid, turn heat on high and cook for 2 minutes or till all the Lalas open their shells.
The total damage for this meal excluding rice is S$9.90.
Time to start your budget planning? じゃね~~
Monday, June 2, 2008
Prawn Noodles/Bee Hoon
Whenever I buy prawns, I like to de-shell and collect the shells in a container. It comes in handy when you need to make stock for soup. I have been freezing pureed vegetable cubes for Ah Boy and I needed to free up some fridge space. I decided to use up my stash of prawnshells, which is about 3 small ice cream tubs. Unknowingly, I have collected about 550g of prawnshells. I was quite shock when I weighed them. It is well worth the effort (and fridge space) as my parents and sis gave me the 'thumbs up' for the soup. My sis joked about the number of prawns died for the soup. Aiyo~ come to think of it, ya... very cruel but you want to eat or not? Most importantly, you want it to taste good or not?
Haha!
I ccoked the soup version as I do not have the chilli to pair with it. Since I am making for my parents too, soup version is a healthier choice. Traditionally, the hawkers will serve this with chilli powder and chopped chillies. After cooking this, I realised I have taken hawkers' food for granted. The preparation part is rather tedious. I felt like charging them for this. These are the steps I have taken to prepare this hawker fare. I have this habit of planning the procedures beforehand so that no time is wasted and the process is smooth. I used bee hoon as I am not a fan of yellow noodles.
Six hours before assembling;
1) Thaw the frozen prawn shells. De-shell and de-veined the fresh prawns.
2) Trim off the fats from pork ribs and marinate with salt and pepper.
3) Cook stock, remove scum.
While stock is simmering;
1) Pick beansprouts, wash and cut kangkong.
2) Cut fish cake.
3) Soak bee hoon with tap water.
One hour before assembling, use a sieve to strain the stock. Squeeze out as much as possible (don't waste) and set aside.
Prawn Noodles/Bee Hoon (serves 6 adults and a toddler)
Ingredients
for Soup
550g Prawn Shells
4 cloves Garlic, bruised
3.5 litres Chicken Stock (I used Swanson's)
3 Tbsp Fish Sauce
10g Rock Sugar
500g Pork Ribs
Some Olive oil
Other Ingredients (some of which I didn't weigh)
400g Bee Hoon, soaked (I used 新竹米粉)
Bean Sprouts, remove roots (I bought $0.20)
Kangkong, cut into lengths
Fish Cake, sliced (I bought 2 pieces)
30 medium size Prawns, de-shelled and de-veined
Some fried shallots for sprinkling
Method
1) In a wok (do not use non stick), heat up the oil. Add garlic and fry till fragrant. Add in the prawn shells. Fry till the prawn shells are dry and a little crisp.
2) Pour in chicken stock and bring to a boil, remove scum. Lower the heat to a simmer, lid slightly covered and simmer for 1 hour.
3) Meanwhile, put the pork ribs in a heat proof bowl, pour boiling water onto the ribs. Drain and repeat, set aside. Add in the pork ribs and bring soup to a boil, remove scum. Add rock sugar and fish sauce. Lower the heat to a simmer, lid slightly covered and simmer for 1 hour. Remove from heat and let it sit for 2 - 3 hours to cool down before straining.
To Assemble
1) Bring the soup to a boil, throw in the prawns and remove from soup once cooked. Take out the pork ribs and set aside.
2) In another pot, bring water (my guess is I used about 1.5 litres to 2 litres) to boil. Using a sieve with long handle, throw in a handful of bee hoon. Let it boil for a couple of minutes. Drain and transfer to a bowl.
3) Blanch the kangkong and bean sprouts till cooked. Throw in some fishcake slices before removing from water. Drain and arrange on top of the bee hoon.
4) Top with prawns and pork ribs. Pour soup and sprinkle fried shallots to complete. Serve with chilli powder or cut red chillies.
*Note : I used 新竹米粉 because I like its springy texture. Lesser risk of over-soaking and over-cooking it.
**Note : Leave the pork ribs in the soup while waiting for the soup to cool. The soup's flavour infused into the pork ribs very nicely. Also, the residual heat makes the pork ribs really tender.
***Note : Noticed I used minimal seasoning as there is some salt in the chicken stock and the fish sauce is salty too. I used rock sugar to balance out the taste. This is done according to the taste of my family. If need be, add some extra salt/fish sauce to taste.
****Note : The prawn shells comes in handy too when you use it as a soup base in place of dashi stock for miso soup.
I used more beansprouts and kangkong. I didn't halve the prawns too. Since it is homemade, why stinge? As I do not have enough containers, I used plastic bags to pack and bring to my parents. While cooking and packing, I really felt like a hawker. Ahahah~~ Everyone finished up the soup including Ah Girl. She asked if I will cook it again. Hmm.. let me consider first, tedious leh.
I will wait till I have collected enough prawnshells and then decide what to do with them again. Never underestimate a simple looking bowl of noodles/bee hoon; is what I have learnt.
Happy cooking!~ それじゃ~~
*Update : A couple of friends asked me why did I pour boiling water on the pork ribs twice before cooking it. 1) This is to get rid of the blood and excess oil. If you don't do this step, you will more scums to remove. 2) This is also to get rid of the 'porky' smell (or is that such a word?).
