Lilypie Kids birthday Ticker Lilypie 2nd Birthday Ticker

Saturday, June 28, 2008

Condensed Milk Pound Cake II

Photobucket

I decided to make this again last Saturday. As I did not take a very good picture of the first cake, I wanted to make another 1 to make up for it. Moreover. although the reviews were good but I feel that it is still a little too oily and on the sweet side for my family. While using condensed milk lends the cake its rich and milky taste, the tricky part of the recipe is to balance the sweetness of the cake. My parents, being the ultra-sensitive sugar detectors, will constantly remind me to cut down on sugar. Perhaps they, too have noticed my expanding waistline and thunder thighs.

Besides contributing sweetness to cakes, sugar helps to moisten the cake. For chiffon cakes and sponge cakes, it helps to build the structure of cakes. Like salt, sugar is a natural preservative. Maybe that is why most cake recipes call for the amount of sugar. It is a constant struggle for me. As much as I wanted to stay true to the recipe (respecting the author), I know that none of us in the family will finish the cake. If I were to reduce the amount of sugar, by what quantity so that it does not affect the cake texture? Or having it still too sweet or ended up, bland? This gave me the excuse reason to test the recipe again till I get it right. Of course, I cannot overdo it too. I think I have to turn on my 'bread mode' very soon.

For this cake, I doubled the recipe and baked in a 8 x 8 inch square pan. With the same effort, I prefer to bake a bigger cake so that more can go around. The cake was big enough to divide into 3 portions and given out to my sis/parents and neighbour. I did not check how long my sis kept it with her but for my neighbour, it only lasted 15 minutes. I guess having older kids helped. Although I reduced the butter and sugar, the cake still taste great. It will taste slightly drier than the previous one though. So, pick 1 to suit your palate.

Condensed Milk Pound II
Ingredients
160g Butter (good quality butter)
40g Sugar
1/4 Tsp Salt
2 Tsp Vanilla Essence
1 Cup Condensed Milk

240g Cake Flour
2 Tsp Baking Powder

*Sift together

4 Eggs

Method
1) Grease a 8 x 8 inch square pan and preheat oven to 170 deg.C.

2) In a bowl, using an electric whisk, cream butter and sugar till light and fluffy. Add in salt, vanilla essence and condensed milk, whisk till incorporated.

3) Stop to add flour. I roughly used the whisk to mix and dampen the flour before turning back on, whisk using low speed. Scrap down the sides and whisk till the batter is smooth and not lumpy.

4) Add in the eggs, 1 at a time, whisk well. Pour the mixture into the prepared pan and bake at 170 deg.C for 1 hour.

*Note : Despite reducing the sugar drastically, my dad and sis said it can be further reduced. However, my neighbour said she preferred it to be sweeter. Haiya.. can't please everyone.

Happy Baking! じゃね~~

Wednesday, June 25, 2008

Braised Lion's head

Photobucket

Another dish which I do not understand the meaning behind its name. Why is it called Lion's Head? Perhaps the vegetables around the meatballs made it look like a lion's mane? The meatballs are supposed to be made to the size of a fist. But I made them into bite size instead. Also, I added more variety of vegetables like carrots and Enoki mushrooms. The original recipe only called for Chinese cabbage (白菜).

Back in the late 80s and early 90s, watching TVB serials was hip. I picked up Cantonese from those dramas that I watched. My Cantonese is still fluent till this day so you have the idea how hooked I was then (my craze now is still Japanese drama). I think I first got to know this dish was through one of those dramas. I remembered the leading lady cooked this for her husband or something. I didn't really get to see how the dish looked like or how they prepared it because the drama was not food-related. The name of the dish was intriguing enough for me to look out for it in a recipe book. Sharing the recipe from an old recipe book that killed the curiosity of mine years back . I made these several times and received positive reviews so far. I later learned that this is a Shanghainese dish. Well, I learnt this from a Taiwanese cookbook. thus I really do not know of the authencity. Perhaps, some good Shanghainese souls out there can share with me? I will be very glad.

Braised Lion's head (红烧狮子头)
Ingredients
(A)

300g Minced Pork
1 Stalk Bok Choy, chopped finely, squeezed dry
Salt to taste
Sugar to taste
1/2 egg, beaten
1Tbsp Corn Flour

Oil for deep frying

(B)
600ml Water
1/2 White Cabbage, cut into sections lengthwise
1 Carrot, sliced
120g Enoki Mushrooms
2 Tbsp Light Soy Sauce
Salt to taste
Sugar to taste

Method
1) In a bowl, mix (A) together and stir well in 1 direction. Heat up oil in a deep frying pan. In 1 hand, squeeze the minced pork through your thumb and forefinger. Use an oiled spoon to scoop the meatballs and lower into the hot oil. Deep fry till golden brown. Drain away excess oil.

2) In a pot, bring water to boil and add in all vegetables. When the water comes to a boil again, add in the meatballs, soy sauce and season to taste. Lower heat to a simmer and cook for 30 minutes.

IH wants to put this on the menu on a regular basis. I cook what, you eat what lah.. don't think too much... Looks like I won't be cooking this again any time soon. Hah~ Photobucket

Happy cooking! それじゃ~~

Tuesday, June 24, 2008

Kam Heong Lala

Photobucket

As I mentioned earlier, there is this Masak Masak Challenge going on. And this time, the theme is to budget food for 4 adults not exceeding S$15. Well, at times like this, with food prices going up, it does help to exercise some budget planning. I actually wanted to do a one dish meal for this challenge but when I passed by the seafood stall, the Lalas are beckoning to me. A quick calculation to make sure that it is within the budget, I got myself a kilogram of it for S$3. Quite cheap one might say but consider most of the money goes to the shell. Photobucket

I have always wondered why Lalas are being called Lalas. This shellfish is a clam but I do not know the actual name for it. We Teochews called it 白仔 which is even more strange. Anyways, I usually cook this with some chilli, Thai basil and bean paste (豆酱), or just dump them in soups. Although they would make rather nice stock as they are sweet and flavourful but it will turn the soup rather milky in colour. Some time back, I blog hop to Sweet Jasmine's and found another way to cook it. What does the name of the dish mean? I am still trying to figure out. Ever wonder how I jot down recipes? I do not print them out. I usually write them on a cue card.

Photobucket

Very simplified, right? I usually group the ingredients that are use in the same step or required the same attention together. It is easier for me to work this way. So thanks Jasmine for the recipe! It's a change for me actually. I seldom attempt recipes that require curry powder. It makes me sneeze alot. Do not laugh when I say I had to use a wet hanky to cover my nose while I cook this (I have no mask). I think I might really need one when I attempt my first curry chicken. I do make a mean Japanese curry though. Perhaps curry cubes are different?

To prepare the Lalas, soak them in a basin of water before cooking. Add some salt to the water. How to know if the Lalas are alive? I will try to pry open the shells (do not overdo it, you'll kill them before they make it to the wok). If it is clammed shut, it is still alive. I much prefer this preparation then discarding them when they do not open after cooking. Sometimes, due to the size of the Lala, the bigger ones might need longer time to open and the heat in the wok might not be evely distributed. This way, it ensures that every clam that goes to the wok is edible.

Kam Heong Lala
Ingredients
2 Tbsp Dried Shrimps, soaked, drained and chopped
1 Tbsp Garlic, chopped
1/4 Red Onion, peeled and chopped
1 cm thick Ginger, minced

1 Red Chilli, chopped
3 Sprigs Curry Leaves, washed
1 Tsp Fish Curry Powder mixed with 1 Tbsp Water

Some Olive Oil
Salt to taste
100ml Water
1kg Lala, soaked, scrubbed clean and drained

Method
1) In a wok, heat up oil, add in dried shrimps, garlic, onions and ginger. Fry till fragrant.

2) Add in curry leaves, curry paste and chilli and fry till fragrant. Add in Lalas and stir fry for a minute.

3) Add in salt to taste and water. Cover lid, turn heat on high and cook for 2 minutes or till all the Lalas open their shells.

Photobucket
The total damage for this meal excluding rice is S$9.90.

Time to start your budget planning? じゃね~~

Monday, June 23, 2008

Green Apple Wine

Photobucket

I took a 'romantic' picture again~~ Photobucket

After 2 disappointing failed attempts of making of Starfruit wine, I gave up and tried with Green apples instead. Actually, the starfruits were not on offer at the supermarket anymore. Green apples were selling on a discount instead. This trial resulted a stronger wine than the Grape wine. Although I have added 10% of sugar of the weight of the apples, the wine was not sweet. I guess for wine making, it would be better if you use fruits that are sour to balance out with the amount of sugar to be used.

I have learnt from my failure of the Starfruit wine. I tried to be smart and reduced the sugar. My parents complained that the Grape Wine was abit too sweet for them. In the end, I had mouldy fruits on top. In all, I threw away 3kg of starfruits. Such waste! I suffered a heartache from this batch particularly.

Photobucket

Spot the 6-sided fruit? I added lemon rind in both batches and they went mouldy by Day 4. They were fermenting well and smelled really nice and alcoholic. I could have scooped away the mouldy part and continued with the fermentation. But I was really afraid of poisoning lah~~ Photobucket So after some struggle, I threw them away (*heartache~ heartache~).

For the Green Apple Wine, I used 2kg of fruit and 200g of sugar. I put 1 layer of sliced apples and 1 layer of sugar. I saved abit more sugar for sprinkling on the top. This part I did not do it for the starfruit batches as I overlooked the importance of it. To make the condition unsuitable for moulds to grow, I covered the apple slices on top with lots of sugar.

Photobucket

By Day 3, there will be more bubbles. I do find that it takes a longer time than the grapes. By Day 4, the apples will start to float on the wine (sorry, no pictures).

Photobucket

During harvest on the 8th day, I regretted 1 thing. I should have juiced the apples and thrown in the pulp instead of slicing it. I think the fermentation process will be faster and it will be easier to extract the wine during harvest. After squeezing the content, I only yielded about 700ml of wine. Much is trapped in the slices.

Photobucket

After settling, there will be a layer of sediments at the bottom. I left it in the fridge and it was still bubbling. A sign that fermentation is incomplete. However, I would suggest drinking at this stage, it tastes slightly gassy, which was quite good. Best drank chilled or with ice.

I would suggest drinking homemade fruit wines as soon as possible after harvesting. Leave as little space as possible in the container as when the wine comes into contact with air, it will turn into vinegar.

じゃね~~

Soy Milk Ice cream (Eggless)

Photobucket

This is one of my experiments and my laboratory, as usual is my kitchen. I remembered over at Kitchen Capers, a fellow forumer was looking for the recipe for Soy Milk Ice Cream. It was something I was looking for too. How to make a cholesterol-free and healthier ice cream has always been on my mind. I know I am singing to the same old tune that I try to make this and that in a healthier version for the sake of my parents. It is my way of repaying what they have done for me, for raising me up. In a way, I am seeking redemption of what hurt I have caused them in the past.

Anyway, back to the ice cream. I blog hopped to Cecily's and found this food blog event hosted at Mike's Table. This gave me the final push to test out what I have drafted on paper. I wanted try making this without egg yolks but I realised that I may not be able to achieve the custard like texture before freezing or even before stirring in the whipped cream. Without achieving that state, I can foresee that it will turn out to be a sorbet or icicle pop instead. Therefore, I added Tofu. Yes, you read right. I used blended Tofu to replace the texture of custard. My helper went, 'Eeeww~' at the thought but after tasting it, she liked it. Ahahah~~ I tried as much as possible to reduce the fat content but whipped cream is really necessary for the ice cream to achieve the creamy texture.

Soy Milk Ice Cream (or Tofu Ice cream if you prefer)
Ingredients
150ml Whipping Cream (35% fat content)

300g Silken Tofu
80g Condensed Milk (I used low fat)
100ml Unsweetened Soy Milk
1/2 tsp vanilla essence

Method
1) In a bowl, whip whipping cream to mousse state. Chill in the fridge.

2) Remove the tofu from the container and blanched in boiling water for 3 to 5 minutes. Leave aside to cool completely.

3) In a blender, add tofu, condensed milk, soy milk, vanilla essence and blend till smooth.

4) Fold in whipped cream and pour into a container. Freeze for 3 to 4 hours. Remove from freezer and whisk the mixture till smooth and creamy. Use a blender if you want.

5) Return to container and freeze till set.

Simple? Do give it a try.

それじゃ~~

*Update : The round up is up! Check out here for details. It's a great place if you are collecting frozen dessert recipes.

Friday, June 20, 2008

Chiffon Cake Tips and Trouble

I took the opportunity of baking pandan chiffon cake to take a step by step picture for the process. I hope this will help those who are attempting to bake a chiffon cake for the first time. I will update this post again when I am ready for the problem part. Perhaps you would like to drop me a note about the problem you experienced during baking a chiffon cake. I will try my best to answer.

I am using this receipe. You will need 2 clean mixing bowls. Crack and separate the egg whites and egg yolks into respective bowls. You will find that chilled eggs are easier to separate than eggs at room temperature. However, during whisking, room temperature eggs will achieve stiff peak faster than chilled eggs.

Photobucket
1. Whisk 4 egg yolks with 30g of sugar till the sugar dissolves. The yolks will look pale.

Photobucket
2. Add corn oil, 40g.

Photobucket
3. Whisk to emulsify the yolk and oil.

Photobucket
4. Pour coconut milk and pandan juice mixture.

Photobucket
5. Whisk together.

Photobucket
6. Add sifted flour.

Photobucket
7. Stir well with whisk till there are no lumps. Take note and recognise the texture of the batter. It comes in handy when you want to substitute flavours. After adding flour, when you lift up the whisk, the marks will disappear in 3 counts. My handphone camera is too slow to capture this.

Photobucket
8. In another bowl, whisk the white till foamy.

Photobucket
9. Add sugar in 3 additions and whisk till soft peak. Notice the tip.

Photobucket
10. Add cream of tartar. It is a type of acid added to stabilise the whites.

Photobucket
11. Whisk the whites till stiff peak. Take note of the tip again, it shouldn't flop like the previous picture. The whites should look glossy, not foamy. If they look foamy and you see liquid at the bottom, you have overbeaten the whites. The egg whites have separated into protein and water.

Photobucket
12. The ultimate test of faith. Attempt at your own risk. If you have achieved stiff peak, the whites will not drop. From this step onwards, you will need to act fast. If the whites are left to stand, they will start to separate (lazy bums who dislikes standing) into water and protein.

Photobucket
13. Add a portion of whites (approx. by eye 1/3)

Photobucket
14. Fold in to lighten the yolk batter.

Photobucket
15. Pour in the yolk mixture into whites.

Photobucket
16. Fold in the batter in quick and swift strokes. Be light-handed. Be careful not to deflate the white. Slide the spatula into the bottom and scoop the whites up. This is the final battle batter.

Photobucket

17. If you are using a 4 yolks, 5 whites recipe and a 21cm tube pan like me, you can use the 2 dots at the side as a datum. The batter should fill up to the bottom of the 2 dots. Bang the pan on a flat surface to get rid of those big bubbles trapped in the batter during pouring. I did not take the picture of the cake in the oven because Ah Boy woke up for milk when the cake rise. If the folding is done correctly, the cake will rise to the same height as the centre tube. I need to tent the cake to avoid the top being burnt.

Photobucket
18. Overturn the pan to cool. Allow ample space below for air circulation.

Photobucket
19. The cake will deflate after cooling. The final height should be about the same as the tin or slightly more. Run a shape knife along the side of the pan and bottom to remove the cake.

Photobucket
20. Final product. Dig in.

Do not be afraid to attempt chiffon cakes. It is not as difficult as one would have thought. Once you grasp the basics, it is a breeze to make one. All you need is a little practise.

To be continued~~

Pandan Chiffon Cake

Photobucket

Pandan (Screwpine) chiffon cake must be the most well-loved chiffon cakes. I have read in the newspapers that artistes from Taiwan and Hong Kong raved about this 绿色蛋糕 (green cake) like it is some kind of ambrosia and would bring back boxes of them as gifts for their friends and relatives. To me, it is kinda strange phenomenon. Yes, I love it too but I will not go all out to buy it, let alone buy them as gifts (people might call me a cheapo behind my back). Perhaps we have taken things that are always available for granted. Pandan chiffon cakes can be easily available at neighbourhood bakeries. Correct me if I am wrong but I think it might have been made popular by Bengawan Solo. I think they are selling it at S$7 to S$8. Even BreadTalk came up with Strawberry chiffon cake (with frosting), costing S$18 for one. *Ahem~ which I will not buy. Just work out the sums and you will know why.

If I recall correctly, the Straits Times papers featured chiffon cakes recently. Most of us growing up eating it. I do not know anyone who doesn't like chiffon cake (let me know if you do). I think the combination of the pandan leaves and coconut milk is a match made in heaven, making it irresistable. On top of that, who could resist a soft and fluffy cake? To me, it is one of the comfort food. I am very fortunate to have a mom who cooks and bakes well. Chiffon cakes is one of her specialty. Her most popular flavours are Orange chiffon cakes and Pandan chiffon cakes. I remembered her baking 6 chiffon cakes in a row, one after another. Every one of them were perfect!

I didn't bake much when I was still single. When I picked up baking again, my first chiffon cake flopped. I followed some online recipes and failed miserably. I went back to my mom for help and she dug up her recipe and gave it to me. She told me what to look out for, tips and tricks to make a good chiffon cake. The 'shifu' (master) is right in front of me but I didn't see it. I must be blind. My chiffon cake recipes are modified based on her Pandan cake recipe. Strange how I make all those previous flavours but did not attempt the Pandan version. So here is my modified version of her chiffon cake, which yields the same soft and fluffy cake but with reduced sugar and fat.

Pandan Chiffon Cake
Ingredients
(A)
4 Egg Yolks
30g Fine Sugar
1/4 Tsp Salt
40g Corn Oil (*edited*)
140g Coconut Milk + Pandan Juice

*Take 130g~140g of coconut milk and blend 8~10 pieces of pandan leaves to get the above

(B)
120g Cake flour
1/2 tbsp Baking powder

*Sift 2x

(C)
5 egg whites
50g castor sugar
1/2 tsp Cream of Tartar

Method
1) In a bowl, using hand whisk, whisk yolks and sugar till sugar dissolves.

2) Add oil and salt, whisk and add coconut milk and pandan juice. Stir well.

3) Fold in sifted flour and mix well.

4) In another bowl, using an electric mixer, beat till the whites are frothy. Add in sugar gradually and beat till soft peaks.

5) Add in Cream of Tartar and beat till stiff peaks.

6) Fold in 1/3 of the whites into the yolk mixture using a rubber spatula till incorporated.

7) Pour the mixture to the remaining egg whites and fold in gently till incorporated.

8) Pour the batter into a 21cm chiffon tube pan. Bang the pan on the table to get rid of bubbles.

9) Oil a piece of aluminium foil and cover the pan loosely. Bake at 170 deg.C for 10mins.

10) Turn down the temperature to 160 deg.C and bake for 20mins.

11) Reduce the temperature to 150 deg.C and bake for 10mins. Insert a skewer to check if the cake is done. Remove the foil and bake for another 5 to 10mins to brown the surface.

12) Remove from the oven and invert the pan. Run a sharp knife along the edges to remove the cake from pan when it's completely cooled.

*Note : As I usually bake at night during weekdays, the wet market is closed. Moreover, fresh coconut cannot last till I get home. I used chilled coconut milk instead. Those that are in sterilised pack, which water needs to be added before usage. I am not impressed with its taste. If possible, try to get fresh coconut milk.

**Note : I prefer not to use artificial flavouring such as pandan paste and colouring.

One thing to take note of my modified recipe is that it cannot keep well. For cakes to keep better, more sugar and fat is needed. I reduced just enough sugar to keep my parents and the egg whites happy. Thus should you use my recipe, I would suggest to finish it within 3 days, if it can last that long. Ahahah~ Else, please refrigerate what is left. Be sure to keep them in an airtight container as chiffon cakes will absorb other smells in the fridge.

Happy baking~ それじゃ~~

*Update 07/19 : A fellow blogger, Katherine spotted my typo. The corn oil used is supposed to be 40g instead of 20g. Apologies.

Monday, June 16, 2008

Chocolate Pound Cake

Photobucket

I went on to bake this Chocolate Pound Cake for my helper after baking the 2 cakes. Like the previous picture, it was taken using IH’s phone. The pictures did not do justice to the cakes. My apologies. Her brother is working on a trawler. The trawler will dock here for 4 months due to some engine problem. She requested to swap off day this Sunday to meet her brother and cousins who all work on the same ship.

I understand from my helper, chocolates in Philippines are of quite inferior quality. She said chocolates are mixed with flour or something, none of the pure stuffs we got here. I also came to know that she would buy loads of chocolates to bring home to Philippines because of this. Filipinas have sweet tooth, she told me. It is no wonder that when I gave out bakes to the neighbouring helpers, they always seemed very happy. I guess I am quite popular among the helpers. Ahahah~~ They will always acknowledge me when they walk pass.

I made this partly to experiment with the mixing method used in the Condensed Milk Pound Cake. If I knew this method earlier, I would have used it for Ah Boy’s First Month celebration instead of this. It is so much simpler. I used the simple pound cake common sense as a rule to devise the recipe that follows, that is to use equivalent amount of butter, sugar, flour and eggs. However, I replaced 20g of flour with cocoa powder and added another 10g more for that sinful chocolaty taste. Other add-ons, I copied from the condensed milk pound cake recipe. The result? Same fluffy cake and flavourful cake, minus the condensed milk taste. The mixing method will work for other similar pound cake or butter cake recipe.

Chocolate Pound Cake
Ingredients
150g Butter
150g Sugar
1/4 Tsp Salt
1-1/2 Tsp Vanilla Essence
60g Evaporated Milk

130g Cake Flour
30g Cocoa Powder (I used Valrhona)
3/4 Tsp Baking Powder
1/8 Tsp Baking Soda

*Sift together
3 Eggs

Method
1) Grease a 7 inch round pan and preheat oven to 170 deg.C.

2) In a bowl, using an electric whisk, cream butter and sugar till light and fluffy. Add in salt, vanilla essence and evaporated milk, whisk till incorporated.

3) Stop to add flour mix. I roughly used the whisk to mix and dampen the flour before turning back on (you don't want the flour to fluff up), whisk using low speed. Scrap down the sides and whisk till the batter is smooth and not lumpy.

4) Add in the eggs, 1 at a time, whisk well. Pour the mixture into the prepared pan and bake at 170 deg.C for 1 hour.

*Note : I used a round pan as I do not have a bigger loaf pan. I used my toaster oven to bake this.

According to my helper, cake was wiped out real quick. Perhaps I should have baked a bigger cake. I also have an idea how to go about for Ah Girl’s birthday cake in August.

Happy baking! じゃね~~

Condensed Milk Pound Cake

Photobucket

Terri from A Daily Obsession asked if I have pound cake recipe to share. One that yields an evenly densed but light cake. Sad to say, I do not make pound cakes that often. To be honest,I only have 1 or 2 butter cake recipes. Guess I am more obsessed with Chiffon Cakes and Sponge Cakes. Ahahah.. I recalled Yuri mentioned about making a Condensed Milk Pound Cake. That's interesting! It was on my to-do list but I got distracted with other stuffs along the way. Taking this opportunity, I hopped to Simply Anne's blog for the recipe. Looking at the picture of her cake made me realised 1 thing. My photography sucks! Big Time too! I used IH's handphone to take the pics after my phone went dead. I left my charger in the office AGAIN! I don't know why the pictures taken with his phone look so horrid. I thought those using my phone were bad enough. I also did a mistake. I overturned the cake onto the cooling grid. Photobucket Why would I want to do that???! Am I not supposed to have that nice looking split top? Photobucket

Anyway, no point mourning moaning about it. Like our PM said about the MAS escape, WKS and COI report; move on. Duh. Pound cakes got their name due to the amount of ingredients used. 1 pound of flour, 1 pound of eggs, 1 pound of sugar and 1 pound of butter. This will yield 4 loaves of cakes which is 1 pound each. That is also why the French called it quatre-quarts. In those early days, eggs are used as the only leavening agent in cake baking. However, as time progressed, we have baking powder, baking soda to help to achieve a fluffier effect. It is also right to say that Pound Cake is the mother of Butter Cake.

One thing caught my eye about this recipe is the ease of making it. The previous butter cake recipe I tried calls for egg separation method for its fluffy texture. And usually, after creaming the butter and sugar, the next in line will be the eggs. This recipe however, called for the eggs to be added last. For this recipe, all you need is a electric whisk, a bowl and a spatula for the mixing stage. I reduced the original recipe to 2/3 as my loaf pan is only 8 x 3-1/2 inch. I followed the suggested brand of butter (Lurpak) but reduced it after converting the recipe to metric. I also used my small toaster oven to bake this. There you go, a fool-proof recipe. Thanks Anne for sharing~ And Terri, it's your turn now. Hee~

Condensed Milk Pound Cake
Ingredients
120g Butter (good quality butter)
55g Sugar
1/4 Tsp Salt
1-1/2 Tsp Vanilla Essence
1/2 Cup Condensed Milk

120g Cake Flour
3/4 Tsp Baking Powder

*Sift together

2 Eggs

Method
1) Grease a 8 x 3-1/2 inch loaf pan and preheat oven to 170 deg.C.

2) In a bowl, using an electric whisk, cream butter and sugar till light and fluffy. Add in salt, vanilla essence and condensed milk, whisk till incorporated.

3) Stop to add flour. I roughly used the whisk to mix and dampen the flour before turning back on (you don't want the flour to fluff up), whisk using low speed. Scrap down the sides and whisk till the batter is smooth and not lumpy.

4) Add in the eggs, 1 at a time, whisk well. Pour the mixture into the prepared pan and bake at 170 deg.C for 1 hour.

*Note : After converting, the butter to be used is 150g to 110g of flour. I made the adjustment as I feel that I might get a butter overdose if I add that much. Also, the original recipe called for roughly 67g of sugar, I reduced t0 55g to cater to my family's taste.

**Note : I would suggest lining the pan instead of greasing it. So when the cake is done, you can just grab the lining paper and pull the cake out instead of leaving it to cool in the pan or overturn it onto the cooling grid.

***Note : Milk is added to pound cakes or butter cakes to give them a moist texture.

I love this cake! It has a rich condensed milk taste and smell. It's moist, light and rich at the same time. Definitely a keeper! My helper said it taste just like the Sara Lee's Pound Cake, if not, better. Hmm.. It has been some time since I had Sara Lee's Pound Cake, should I go get 1 to try out? On second thought, I will probably bake this again tonight. There is only 1 piece left in the container this morning. My bet is it will be gone by the time I get home.

それじゃ~~

Soy Milk Chiffon Cake

Photobucket

I was on a baking frenzy and baked 3 cakes on Saturday. Bear with me as I put up the recipes one by one. I was blog hopping when I saw post about Soy Sponge Cake. It reminded me of the Soy Chiffon Cake I made before I set up this blog. Since childhood days, I associated soy milk or soybean milk as a breakfast beverage. Usually the hawkers will only sell soy milk and bean curd in the morning and by noon, most of the soy milk stalls will be closed. Apparently, the short shelf life of freshly made soy milk is the reason behind this. However, these day, pasteurised soy milk is easily available at supermarts or mini-marts.

If you are lactose intolerant, you can drink soy milk as an alternative. There are also soy formula milk available for babies who are lactose intolerant. Besides protien, it contains Polyunsaturated fats and Monounstaturated fats that are good for the heart. It is also said to reduce the bad cholesterol in the body (source : wikipedia). You can actually make soy bean milk at home or even tofu. I have not explored into this area yet, perhaps those who have tried are willing to teach me? Alright, back to the cake. Previously, what I have done is making some adjustments to my chiffon cake recipe. I used 110g of cake flour, 140g soy milk (unsweetened), 40g corn oil, 80g sugar and 1-1/2 tbsp of soy flour. The result was alright however, I do not intend to revisit this recipe this time.

My parents just went for their blood test, while mom's report was alright, but dad must have been rather lax on his diet and his report showed it. Keeping that in mind, I hope to create a low cholesterol or a cholesterol-free cake for them. It's Father's Day so I made them a Soy Chiffon Cake, minus the egg yolks. While the texture is rather soft and fluffy, the cake is sort of weighed down by the amount of soy flour and milk I used. It did not achieve the usual height I have for the other chiffon recipes. You see, I was kind of obsessed with the yolks substitution. Soy flour can be used to replace eggs in a vegan cake recipe. 1 egg yolk is about 18g, As I am still using a spring scale, I rounded it up to 20g. I was trying to make up for the absence of the yolk. I experimented with 10g of soy flour and 10g of water to get the texture that looks like the egg yolk consistency. Therefore, for 4 egg yolks, I will be using 40g of soy flour and 40g of soy milk. I don't know why but somehow I jotted it as 30g of soy flour and 30g of soy milk on top of the initial 1-1/2 Tbsp of soy flour. Thank goodness for this mistake! Else I will be blogging this as soy pancakes.

Anyhow, The cake turned out rather well but still needs some tuning. Taste-wise, how do I put it? Well, it tastes like soy milk, it smells like soy milk, you know you are eating a soy milk chiffon cake. This yielded a richer soy tasting cake than my previous version. This is what I did.

Soy Milk Chiffon Cake (Yolk Free)
Ingredients
(A)
180g Unsweetened Soy Milk (I used Sobe)
30g Fine Sugar
1/4 tsp Salt
50g Corn Oil
1/2 Tsp Vanilla Essence

(B)
110g Cake flour
40g Soy Flour
1/2 tbsp Baking powder

*Sift


(C)
5 Egg Whites
50g Fine Sugar
1/2 Ttsp Cream of Tartar

Method
1) In a bowl, using hand whisk, whisk (A) till incorporated.

2) Add (B) and mix well.

3) In another bowl, using an electric mixer, beat till the whites are frothy. Add in Cream of Tartar and beat till soft peaks. Add in sugar gradually and beat till stiff peaks.

4) Fold in 1/3 of the whites into the mixture using a rubber spatula till incorporated. Pour the mixture to the remaining egg whites and fold in gently till incorporated.

5)Pour into a 21 cm chiffon tube pan. Level the batter with a spatula. Bang the pan on the table to get rid of bubbles.

6) Oil a piece of aluminium foil and cover the pan loosely. Bake at 170 deg.C for 10mins.

7) Turn down the temperature to 160 deg.C and bake for 20mins.

8) Reduce the temperature to 150 deg.C and bake for 10mins. Insert a skewer to check if the cake is done. Remove the foil and bake for another 5 to 10mins to brown the surface.

9) Remove from the oven and invert the pan. Remove the cake from pan when it's completely cooled.

*Note : Mixture (A) will be heavier than your regular egg yolk batter. This is normal due to the extra soy flour used.

**Note : Perhaps I should just replace some of the cake flour with soy flour (toying with idea of 90g cake flour and 30g soy flour) to get a lighter cake. Disregard the yolks entirely and stick to 140g of soy milk.

I'm biased so my vote doesn't count, I actually like the smell and taste of it. IH is not receptive to new flavours so his vote is neglible. Most importantly, my parents liked it. Whichever version you decided to try out and let me know the outcome alright?

Let's experiment! じゃね~~

Thursday, June 12, 2008

Chocolate Sponge Cupcakes

Photobucket

Erm.. no.. these are not muffins. As the title suggests, they are sponge cakes baked in a cup. Well, a muffin cup to be exact. And, do not ask me how the dome happened, it just did. I came home rather late, about 9 p.m. Ah Girl requested chocolate cake for breakfast so I had to bake (good excuse, no?). I realised I have not been baking sponge cake for a long time. So, instead of the usual chiffon cake, I baked a sponge cake. This recipe is shared by my younger sis, S. She is an avid baker who has achieved much more than me, in my opinion. During my younger days, I went crazy over J-drama and Japanese food. I was more into cooking. She was very much into baking. I started to explore into bakes such as bread only recently and she could already bake sweet buns then, kneading by hand. She was probably 14 or 15?

I would say she’s an expert in sponge cake and had an excellent sponge cake recipe which she perfected and proudly called her own, the ‘S-sponge cake’. In recent years, we swapped; she went crazy over Japanese food, I’m into baking. Ahahah~~ My youngest sis, J, is baker too. Among the 3 of us, she has a flair in art. I am envious of her cake decorations skills, especially her piping skills. Like the 2 of us, she has no formal training but her cakes look store-bought. It was a dream of mine to set up a café. S, will be in charge of the baking, J will take charge of decorating and me, the beverage (I used to brew siphon coffee at a café). I admit I've been reading too many comics.

Back to the sponge cake, this is not ‘S-sponge cake’ but S likes recipes which are simple to follow without complicated steps, which also means, less utensils to wash. This cake is very ‘airy’ and light-weight as she would describe. Ah Girl loved it when S baked it. Thus, there is no reason why I would not want to bake it. Especially late at night, I do not want to bake a too complicated cake. Baking them into cupcakes make sense as I do not have to wait for 40 minutes for a whole cake. Also, this is the first time I am using this oven for sponge cake and I am simply too tired to make notes. Having said that, Ah Boy woke up for milk when I sent these into the oven. I was nowhere near the oven so I did not know how they progressed. When I emerged 15 minutes later, they were done and I was rather surprised with the dome top. Other than that, the texture is light and fluffy. Most importantly, Ah Girl took a bite this morning and identified it to be ‘Ah Yi’s’ (阿姨) cake and ate it without much fuss. This recipe is using whole egg method.

Chocolate Sponge Cupcakes (yields 10 cupcakes depending on size of cups)
Ingredients
(A)
4 eggs
120g Sugar

(B)
80g Cake Flour
10g Corn Flour
30g Cocoa Powder
2 Tsp Baking Powder

*Sift together 2 x

(C)
40g Melted Butter

Method
1) In a bowl, using a electric whisk, whisk (A) till thick and creamy (ribbon stage)

2) Add in (B) in batches and fold in carefully, do not deflate (A).

3) Stir in (C) till incorporated.

4) Pour into individual cups (80% full) and bake at 170 deg.C for 15 to 20 minutes or when the skewer comes out clean. Open the oven door, slightly ajar to cool the cake slightly before removing to the cooling grid.

*Note : Do not dump in the flour onto the egg batter as this will deflate it. I slowly sifted the flour (2nd time) in batches and fold.

**Note : I pour in the melted butter along the side of the bowl for step (3). Alternatively, you can take out some of the batter out and mix with the butter stirring into the rest of the mixture. This is to ‘lighten up’ the melted butter so that it will not deflate the batter.

***Note : It is normal that the batter will deflate a little when you add the melted butter. The cake will deflate slightly after removing from the oven.

Easy peasy? それじゃ~~

Monday, June 9, 2008

Neapolitan Chiffon Cake

Photobucket

There is this Masak Masak Challenge going on in the forum I frequent. The instructions were to combine all 3 ingredients in the dish, namely, chocolate, cream cheese and fruit/s of your choice. I started out thinking about the possible combinations, the easiest would be a mousse cake (but no one to help me finish it), brownie (so very sinful), I even thought of using dark chocolate, cream cheese and orange to make a sauce for a steak (weird, no?)! In the end, I came up with the above, Neapolitan Chiffon Cake on last Friday. You may say that I slipped into my comfort zone once again. But this time round, it is not as easy as it looks. I ended up with plenty of bowls to wash and I am not that satisfied with the result. Couple of things I learnt when I made this; 1) Get a digital scale for Pete's sake! 2) Never attempt this in the wee hours of morning, especially at 1.30 a.m. 3) Do not use a silicone spatula. 4) Read the texture of the egg whites and work fast!

Point #1 & #2 : I have been using those spring scale for the longest time without any problem. However, it's either I weighed it wrongly (the mixing bowl was way to big for the scale anyway) or my noodle wasn't working at 1.30 a.m. I had to divide the yolk batter and the egg whites into 3 portions. After adding the respective ingredients, I realised that I ended up with lesser batter for the strawberry portion. Half way through dishing out the whisked egg whites, I forgot which line was the datum! Argh! Photobucket So I had to rely on estimation by eye. Thank goodness the cake turned out alright!

Point #3 : I tried out using the silicone spatula I bought from Daiso. It is too soft for mixing chiffon cakes, especially when you need to scoop up the yolk batter. Maybe it's just me, but I prefer to use the regular plastic type so I can make quick and swift moves while mixing. So I switched back to my trusty plastic spatula.

Point #4 : For this attempt, I have added the egg whites to the respective batters just before pouring them in the pan. By the time you reach for the last layer, the egg white will be slightly deflated. You have to whisk it again before you mix it into the yolk batter, or you will end up with a deflated top. However, take care not to overbeat the egg whites. Work out the procedures in your mind and re-run it again and again. Prepare everything you need and work fast! Time and egg whites wait for no man. Photobucket

This is how I do it. This cake is more difficult than a Marble Chiffon Cake and I would not recommend making this cake if it is your first attempt in baking Chiffon Cake.

Neapolitan Chiffon Cake

Ingredients
(A)
4 egg yolks
30g castor sugar
1/4 tsp salt
40g corn oil

*Divide into 3 equal portions

(B)
120g Cake flour
1/2 tbsp Baking powder

*Sift 2x and divide into 3 portions

(C)
5 egg whites
50g castor sugar
1/2 tsp Cream of Tartar

*To be divided into 3 portions later

(D) Chocolate Layer
1/2 heaped Tbsp Cocoa Powder
40g Evaporated Milk (warmed)

*Mix well

(E) Cream Cheese Layer
10g Cream Cheese
35g Evaporated Milk
1/4 Tsp Vanilla Essence

*Melt cream cheese using double boil method, add milk and essence

(F) Strawberry Layer
45g Strawberry Puree (I used store bought)
1/4 Tsp Strawberry essence
3 Drops Red Colouring

*Mix together

Method
1) In a bowl, using hand whisk, whisk yolks and sugar till sugar dissolves.

2) Add oil and salt, whisk well. Weigh and divide into 3 portion, you will need 3 bowls. Add (D), (E) and (F) into each respective bowls and mix well.

3) Fold in portioned flour into each bowl and mix well. Set aside.

4) In another bowl, using an electric mixer, beat till the whites are frothy. Add in Cream of Tartar and beat till soft peaks. Add in sugar gradually and beat till stiff peaks.

5) Weigh and calculate the required egg whites for each portion. Scoop out the required portion and fold in the whites into the chocolate batter till incorporated. Pour into a 21 cm chiffon tube pan. Level the batter with a spatula.

6) Repeat for the cream cheese batter.

7) The egg whites left will be slightly deflated by now. Whisk the egg whites again and repeat the mixing procedure for the strawberry batter.

8) Bang the pan on the table to get rid of bubbles.

9) Oil a piece of aluminium foil and cover the pan loosely. Bake at 170 deg.C for 10mins.

10) Turn down the temperature to 160 deg.C and bake for 20mins.

11) Reduce the temperature to 150 deg.C and bake for 10mins. Insert a skewer to check if the cake is done. Remove the foil and bake for another 5 to 10mins to brown the surface.

12) Remove from the oven and invert the pan. Remove the cake from pan when it's completely cooled.

I finished baking this cake at 3.40 a.m. Photobucket I left it to cool in the pan and cut it later in the morning.

*Note : I may still have to attempt this cake again (when I get my hands on a digital scale and definitely make this in an afternoon) as I am not very satisfied with the result. The chocolate layer rose too much; I may have to switch off the lower heat at 1 stage.

It smelled really nice in the oven (think strawberry and cream). Taste-wise; not too bad although Ah Girl only chomped off the chocolate part and commented I should bake the whole thing chocolate. Okay, point taken. So now I know she loves chocolate and she is not adventurous when it comes to food. She called me a 'magician' when I cut the cake.

I will consolidate and put up the tips on making chiffon cakes later in my blog. Hope it will be useful for those trying to attempt chiffon cakes. Trust me, it's not as scary as you thought. ^_^

Happy baking~ それじゃ~~

Thursday, June 5, 2008

Red Glutinous Rice Wine

Photobucket

Red glutinous rice wine, or known as 红糟酒 , has its origin from China, 福州 , Fu Zhou (alternatively pronounced as Foo Chow or Hock Chew). From my understanding, it is mainly used in confinement meals (after delivering baby). Maybe it is used in other occasions too but since I do not have any friends from the dialect group, I am unable to verify. However, to me and my mom at least, you do not need any special occasions to enjoy good food! I have been wanting to make this wine for some time but I was not confident enough to do it. After successfully making my own fruit wine, I decided to embark on this experiment. Another factor that spurred me on is; my friend M is having a baby and is due this month.

After delivery of baby, the Chinese believes that the mother needs to recuperate and get back her health by eating norishing food and resting well. The confinement period can range from 30 days, 40 days or 3 months, depending on your lifestyle. From my personal experience, I was not allowed to eat certain food like yam, tapioca, sweet potatoes, mutton, prawns, etc., for 3 months. Cold drinks are not allowed. For 30 days, I was made to sit down when drinking fluid, I was not allowed to squat or bend down to carry heavy objects. I was also encouraged to lie down instead of sitting up for long period of time. The 'no-bathing' rule was ignored by me as I couldn't imagine myself stinking in my own sweat for 30 days. For food, it is believed that due to blood loss during childbirth, the body is 'cold' and thus need 'warm' elements like ginger and wine to 'warm' the body. So that's why alot of ginger is being used for confinement food. However, it should be warned that excessive ginger in the diet may also result in breastmilk jaundice (source : from a paedtrician). Taking large amount of wine is not advisable especially when you are breastfeeding.

Back to M, she has lent me her support and advice during a very difficult time. It is my little way of showing her my gratitude. I hope both she and her baby will be in good health. Can't wait to see her baby. I would like to share the method of making this wine with you. There were alot of myths about wine making but I have learnt from this site and Gina that they are unfounded. I would like to thank Gina for her guidance along the way. During wine making, the utmost important thing is hygiene. Just make sure everything you use is sterilised and clean. I have heard people citing bathing before making or you cannot make wine when it is 'That' time of the month (for the ladies). You must do it before sunrise or when there is no sun. You must do it alone. You cannot talk when making it. I rationalised them as hygiene and debunked some of the myths.

1) You have to wash your hands thoroughly, I washed mine up to the elbows as I have to reach inside the container during preparation.

2) I made this in the morning around 11 a.m. and the weather was rather warm.

3) Without having people around, you have no one to talk to. Unless you like to talk to yourself.

4) I did talk to my helper and Ah Girl.

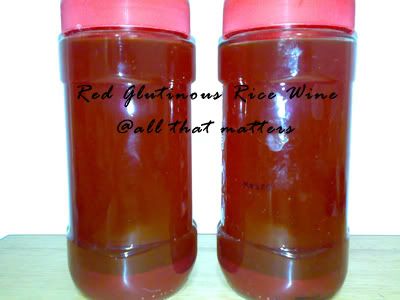
The recipe is not mine can be found on the link above. Below are my personal notes and I have added sugar to the recipe. From what I learnt from fruit wine making, I applied here. Sugar is food for the yeast, it makes the yeast work harder. Thus for this batch, I am very happy that it yielded 1.4 litres of wine and 450g of wine lees (not entirely dry). Basically, the wine will be ready in 21 days. You can also harvest it after 30 days. I harvested the wine on the 24th day.

Red Glutinous Rice Wine (红糟酒)
Ingredients
1 kg Glutinous Rice (糯米) – weighed before cooking
120g Red Yeast (红糟) – blend into fine powder
1 pc Wine Yeast (酒饼)– mash into fine powder
1 Tbsp Sugar (糖)– optional

Method
1) Sterilise the glass bottle (I used 2 kg container) with hot water, overturn and leave to air dry for 2 days.

2) Cook glutinous rice in rice cooker with abit more water than usual. Leave to cool down completely. You can spread out on a tray to cool down faster but you need to cover it. I cooled the rice down in the rice pot overnight in my oven, covered it with an aluminum foil, leaving a gap.

3) Wash hand thoroughly up to your elbows. Make sure they are dry. Wear plastic gloves and mix cooked rice, red yeast, sugar and wine yeast together.

4) Transfer the mixture into the glass container, press it down as much as possible.

5) When done, cover the container with a clean piece of cloth, then close the lid but not too tight. Keep in a cool, dry and dark place (I covered the bottle with newspaper and black garbage bag).

6) Open the lid slightly to release gas on alternate days. Check if there is any mould (white, yellow, green, blue or even pink). If there is mould, you have to throw away and start again (might cause poisoning). After 1 day, you will see water vapour on the side of the container, bottom will start to collect wine. As it progress, the wine will be more but will stop at a certain level.

Photobucket

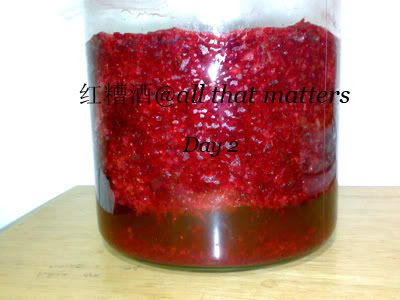
7) If there are no moulds, you can open it to give it a stir on the 7th day (remember to sterilize the ladle), or you can leave it for another 14 days or 23 days, until harvest to stir it. The mixture is quite liquidy. *Note : I forgot to stir on the 7th day, I stirred the mixture before harvest.*

Photobucket

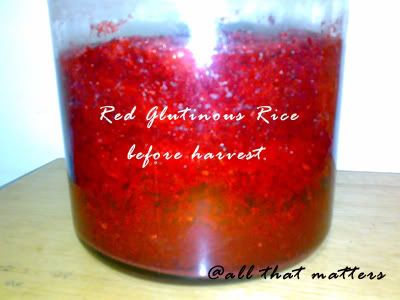
8) To harvest, use a piece of cheesecloth (baby cloth diaper – new of course) to collect the wine, tie the end with string, hang and let it drip. Collect the wine and let it settle for 1 day. The top will be clear, the bottom will have residue. Slowly pour the top portion into a clean glass bottle, or use a wine ladle and funnel to bottle it. Careful not to disturb the wine. The residue can be added to the wine residue collected on the cloth. *Note : Don't waste mah..*

Photobucket

9) Collect the wine residue left in the cloth in a jar. Do not throw this away as you can use it to cook with chicken. This is the 红糟 or known as 酒糟 .

Photobucket

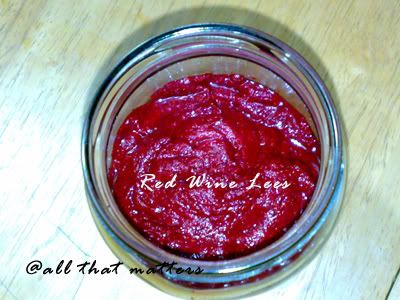
*Further notes : This is what Gina has shared with me. For commercial wine lees, they added salt for longer shelf life and to stop the fermentation. For homemade, you can leave the lees outside, it will still continue to ferment and excrete wine. For the wine, it will continue to age if you leave it outside, however, you have to keep in a cool place and for maximum of 3 months. Else it will become acidic and turn into vinegar. If it turns into vinegar, fret not and throw away not. You can make pickled ginger with it. However, if you are to add some wine lees into the wine, you can keep it out longer without spoilage. The wine will age and develop more flavour. Alternatively, just store the wine in the fridge to stop the fermentation.

I would like to highlight on the mould part. For me, once there is mould, it means something has gone bad, so I will throw away. Some arguments may say that there are good moulds present. While I do not deny that there are good moulds (like those on cheese) however, I am not a trained personnel to differentiate between good moulds and bad moulds. For safety sake, I would suggest throwing it out rather than risk food poisoning. In normal circumstance, if you did a good job on the hygiene part, mould shouldn't appear.

I hope you will find these information useful. And maybe try it out for your loved ones or beloved girl friends. I'm sure they will appreciate your effort.

それじゃ~~

PS : I'm starting another batch for my mom soon!

*Edit to add : My mom said that besides using the wine lees to stir-fry chicken, you can use it to stir-fry pork ribs or steam fish. There's another popular way of using it is cooking 红糟面线 (Mee Suah, also known as wheat flour vermicelli).